
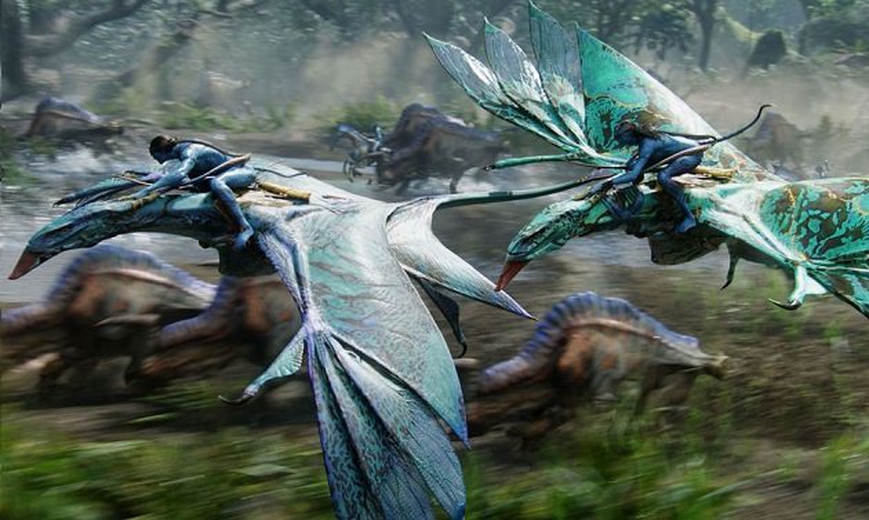
The Making of James Cameron’s Avatar (Project 880)
Before James Cameron left for his 1995 undersea expedition to the Titanic, his 80-page treatment for Avatar was already complete, but the necessary technology did not exist to achieve his story and vision. Avatar gathered dust till early 2005 when advances in digital technology made it possible to tell the story the way he imagined. Under the code name of "Project 880" which was a "retooled version of Avatar," the conceptual process began, along with the technical research and development.
James Cameron himself made the first sketches for the different creatures that he imagined might populate Pandora, his new world. Based on those images, as well as references from the natural world culled from National Geographic photos, botany books, and nature documentaries, a core group of artists, including Wayne Barlowe, Yuri Bartoli, Jordu Schell, and Neville Page, began producing hundreds of pencil-and-paper drawings. In mid-2005, Stan Winston Studio also joined the conceptual and character development process working on the viperwolf, direhorse, and banshee’s head.
Jump To Section
- Creating Pandora’s Zooplantae
- Designing the Direhorse for Avatar
- Bringing Pandora’s Predator, the Thanator, to Life
- Making the Viperwolf
- Building the Banshee
 (Different thanator concepts by Stan Winston Studio's Scott Patton.)
Every drawing had to be approved by James Cameron before rendering to Photoshop. Once a rendering was approved by the director, it was transferred from a 2D concept to a 3D digital sculpture in ZBrush. In some cases, clay models were also sculpted and used for visualizing the designs and to provide lighting reference.
Creating Pandora’s Zooplantae
The organic structures of the Pandoran flora and fauna, the landscapes, and the overall planet Pandora itself all had design origins on the planet Earth. Every Pandoran creature and plant had earthly counterparts, sometimes in hybrid forms. James Cameron's earliest inspirations for predatory creatures included super-slick, aerodynamic bodies and race-car-looking patterns, including racing stripes. Some of the creatures were designed with special breathing holes located in the trachea, echoing the intake valves of high-performance sports cars.
 (Different color schemes for a viperwolf by Jim Charmatz from Stan Winston Studio.)
Another early concept was that Pandora's animals would have six limbs rather than the Earthly norm of four. ILM successfully animated a six-legged viperwolf hunting. The extra legs looked appropriately graceful and powerful in motion, so all of the terrestrial creatures got six limbs, and these extra limbs led the design team to incorporate an extra pair of wings on the flying creatures.
Designing the Direhorse for Avatar
The direhorse was intended to be a creature that Na'vi warriors used for riding and hunting. Conceived as a sort of horse crossed with a dinosaur, it had to incorporate reptilian aspects while maintaining a horse's natural grace and glory. The main terrestrial inspiration for the designers was the Clydesdale horse, with its massive scale and strength.
 (Direhorse clay maquette by Chris Swift.)
Based on Wayne Barlowe's concept, Christopher Swift sculpted the final direhorse maquette. Joseph C. Pepe did design modifications and color designs in Photoshop which ended up serving as the final design scheme for the movie.
 (Color paint over a photo of the direhorse maquette in Adobe Photoshop by Joe C. Pepe.)
As with all terrestrial creatures, getting the six legs to work together and make them seem natural and still beautiful and graceful was one of the greatest challenges. The animators ultimately achieved a natural-looking gallop by coupling the front four legs but off-setting the movement of the first pair by a few degrees.
Bringing Pandora’s Predator, the Thanator, to Life
The most feared land predator on Pandora is the thanator, similar to a Terrain panther. Originally thanator was called manticore. This was the only design where James Cameron did not have a complete vision in his head. Designing this animal took months and hundreds of illustrations.
 (One of the proposed sketches for a manticore.)
 (One of the many thanator designs by Scott Patton.)
 (Thanator sculpture by Jason Matthews from Stan Winston Studio.)
The name was changed to Thanator, and James Cameron himself took on the final design late in the production. Neville Page fleshed out the design and built it as a Zbrush model.
Making the Viperwolf
The lean body and graceful motion of the mink inspired the design of the viperwolf. Jim Charmatz rendered the concept artwork in Photoshop, and then Scott Patton did a 3D model of the head in ZBrush.
 (Clay sculpture of the viperwolf by Jason Matthews.)
 (The life-size viperwolf puppet.)
Stan Winston Studio created a viperwolf puppet scaled to human proportions used for the scene in which viperwolves chase Jake through the forest. The puppet was strapped to calibrators and had patterns that the mocap system could recognize for integration into the scene and to guide the animation. This puppet had the necessary "viperwolf weight" to help sell the illusion of weight and actual impact with actor Sam Worthington in the scene when this beast knocks Jake down.
Building the Banshee
The concept of lower gravity on Pandora was the justification for the evolution of giant fliers like Banshee or the great leonopteryx. Both creatures were conceived as bird-like four-winged aerial predators, extremely colorful and very bright.
The references and inspiration for the banshee (and the giant leonopteryx, too) came from sea creatures such as manta rays, skates, and the great white shark. While sea-creature biology informed the profiles and bodies of the flying creatures, their aerodynamic and hydrodynamic characteristics incorporated the most current thinking of the way extinct species such as plesiosaurs and pterosaurs moved through water and air. But the most unique feature of the banshee was the articulation and mechanics of its mouth and teeth.
 (Banshee head by Scott Patton. The mouth has a two-part upper section that would pull back as rows of the teeth moved forward.)
The skin of both the banshee and the great leonopteryx has a wide range of complex color schemes based on Earth animals, like poison dart frogs and monarch butterflies. Their wings were a mixture of bird and bat wings. And while banshee has only vestigial legs, the great leonopteryx legs are not vestigial at all!
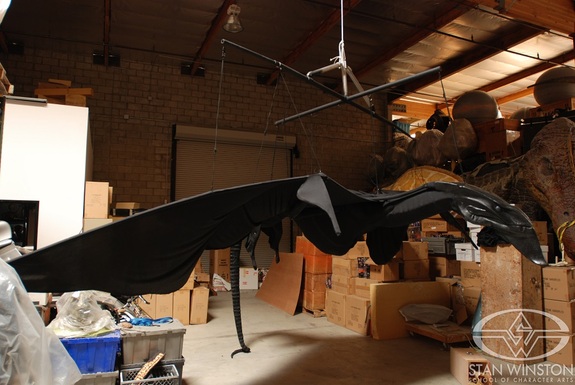 (Stan Winston Studio built a practical model of the banshee, used as a guide and reference for CGI works by Weta Digital.)
"Designing using the computer, whether using 2D Photoshop or 3D sculptures, enabled us to nail down what Jim [Cameron] wanted in a more efficient manner than in the past. We worked out a nice design presentation with Jim that was, I feel, very effective. It was always challenging in a positive way, as Jim always brings out and expects the best from you as an artist, and you feel like you are working on something very special." - SWS Supervisor, co-owner Legacy Effects, John Rosengrant
More Avatar (2009) Behind-the-Scenes Content:
Avatar: Creating the Na’vi - Go Behind the Scenes at Stan Winston Studio - Part Two
Making a Hybrid Character: Building Avatar's AMP Suit and Scorpion
Courses with the Creators of Avatar
- Hybrid Characters: Blending Practical & Digital FX with John Rosengrant
- Creature Design - How To Sculpt Character Maquettes with Jordu Schell
- Creature Design - Maquette Painting Techniques with Jordu Schell
- Making Creature Eyes with John Cherevka
- How To Make Eyes: Puppets, Masks & Makeups with John Cherevka
- Advanced Creature Teeth: Prosthetic Dental Appliances - Part 1 with John Cherevka
- How To Make An Eye Mechanism - Design, 3D Printing & Assembly with David Covarrubias
- Animatronic Control Systems - Arduino Programming Basics Part 1 with David Covarrubias
- Lab Work For Animatronic Characters Part 1: Making A Mechanical Core with Cory Czekaj
- Character Makeup - How To Run Foam Prosthetic Appliances with Cory Czekaj
- Character Makeup - How To Run Silicone Prosthetic Appliances with Cory Czekaj
- Silicone Sculpting & Patching Part 1: How To Seam & Patch A Silicone Mask with Chris Grossnickle
- Silicone Sculpting & Patching Part 2: How To Patch A Prop Body with Chris Grossnickle
- Silicone Sculpting & Patching Part 3: How To Seam & Patch A Silicone Makeup with Chris Grossnickle
- Metallic Painting Techniques - Robot Finishes (Terminator) with Rob Ramsdell
- Metallic Painting Techniques - Real Metal Effects (Predator) with Jamie Grove
- Platinum Silicone Painting Part 1 with Jamie Grove
- Silicone Painting: Realistic Flesh Tones with Jamie Grove
- How To Body Cast And Create A Custom Mannequin On A Budget with Ted Haines
- Foam Fabrication Texturing Techniques with Ted Haines
- Muscle Suit Fabrication Part 1 - Design, Pattern & Fabricate Muscles with Ted Haines
- Maquette Painting Techniques with Trevor L. Hensley
- Hybrid Character Design: Practical To Digital with Christopher Swift
- How To Make A Stone Mold with Gary Yee
- Character Hairwork: Hair Laying for Prosthetic Makeup with Aimee Macabeo
- Introduction to Hair Knotting with Mike Ornelaz