

Andy Schoneberg Paints Lisa del Giocondo, aka Mona Lisa
“I never thought of Lisa del Giocondo as an attractive 25-year-old woman. But after 3 years of studying her face and the beautiful delicacy of Leonardo's expression and modeling, I've changed my opinion.” – Andy Schoneberg
Multi-talented, Emmy-award-winning makeup artist, sculptor, and creature creator Andy Schoneberg has a favorite painting—a painting that inspired an obsessive passion. But the creature depicted in this painting, made over five hundred years ago, is no monster. She is a young woman named Lisa del Giocondo, better known in modern history as Mona Lisa. For Valentine’s Day, we’re taking a look at Andy’s passionate tribute to Mona—a painstaking re-creation of a Renaissance masterwork by a modern Renaissance master with excerpts in Andy’s own words from his comprehensive personal Blog on the subject. – David Sanger
Jump To Section
- Early Attempts at Recreating the Mona Lisa
- Finding the Right Wood
- Using the Same Paint as da Vinci
- Mona Lisa Progress
- A Year of Refinements and Details
- Adding Finishing Touches
- Aging and Gilding the Frame
 (Andy's Mona Lisa “underdrawing” acts as a guide for the oil paints.)
Early Attempts at Recreating the Mona Lisa
“I began to learn to paint at age 12. My parents bought me a small set of acrylic paints, I think it was for my birthday, and I accepted this gift greedily! The first painting I attempted was a portrait of my brother, Steve. The flesh tones were entirely too red, but the seeds for a lifelong study of the human face and anatomy were sown in that first experiment.
Through the years, my quest for painter heroes led me to the study of the works of Leonardo da Vinci. He was, in my teen estimation, the irrefutable champion of painting. His draftsmanship, his use of color and sfumato, chiaroscuro, and all those other mysterious-sounding Italian words hooked me like an eager trout. I immersed myself in study, trying to emulate what I understood of the maestro's method and technique."
Andy actually attempted to copy the Mona Lisa previously. His first attempt, as a teenager, was painted on canvas. His second attempt at a college art history project was painted on a Masonite board. But after being inspired by the publication of a book called Mona Lisa: Inside the Painting. His passion led him to a third attempt, but in Andy's words:
“This time, the goal was to make the final product as close to the original piece as possible.”
 (Visitors at the Louvre Museum in Paris gather around the Mona Lisa by Leonardo da Vinci. Photo by Francois Mori, Associated Press.)
Finding the Right Wood
"My feeling at the outset was that unless a suitable poplar panel could be obtained, the project wasn't worth pursuing. I cast around for a while, looking at various lumber yards on and offline, asking about the possibility of getting a solid poplar panel measuring 22"W x 32"H x 1/2"D. No one supplied such a wide one-piece panel. Then, I found an online Pennsylvania lumber yard named Smith Lumber that has its own sawmill. They could do such a panel if I was not in a hurry. It'd take 2-3 months to dry in the kiln. I waited."
 (The Poplar panels from Smith Lumber. Andy says, “The panel on the left is a very close match in grain pattern to the panel used for the Mona Lisa.”)
Using the Same Paint as da Vinci
"I found a supplier of natural pigments, called, appropriately enough, Natural Pigments, that had nearly every Renaissance era oil painting supply that one could hope for. I used "Mona Lisa: Inside the Painting" as my reference point and listed, according to spectral analysis, the pigments Leonardo used on the Mona Lisa. I bought raw pigments and ground them into paint using walnut oil as my medium. My sources told me that Leonardo used walnut oil as well.
From the same supplier, I bought Italian gesso (calcium sulfate) to be mixed into a hide glue solution and painted on the poplar panels. I tested the gesso and oils on plywood panels of the correct size while I waited for the real panels from the lumber yard back East. I also tested a few formulations of emulsion grounds to use as an intermediate layer between the gesso and paint.
I did some research on possible glazing media for oil. Something that Leonardo might have used. One article I read about Renaissance mediums included a translation from one of Leonardo's notebooks in which he specifies juniper resin mixed with walnut oil as a good varnish. Information I found from various sources indicated that a resin mixed with oil and turpentine is a good general formulation for a glaze medium. So I ordered sandarac (juniper) resin along with unfiltered walnut oil to test as a possible glaze medium."
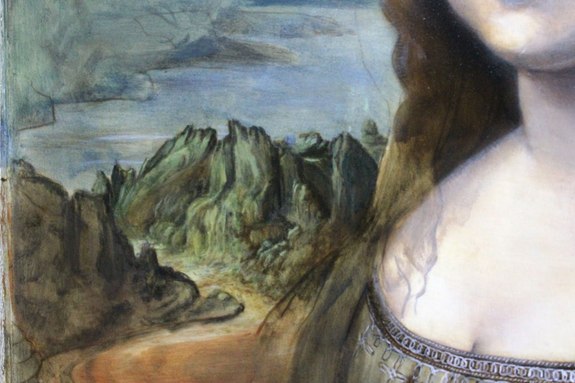 (An in-progress detail of the mountainous area to Mona’s right side. Mona’s flesh has a lead white overglaze to blend shading before adding color and shadow.)
Mona Lisa Progress
After nearly a year of testing materials and techniques, Andy began the painting and slowed only by the demands of his creature effects work schedule, he went from sketch to actual paint.
"I placed layers of semi-transparent and transparent glazes on the panel ,especially in the face. I did two layers of white lead mixed with a little vermillion to mute the underpainting and give a luminous surface to the flesh tones. The white lead mixture and the subsequent glazes of Italian burnt umber and black were mixed with sandarac resin and walnut oil to make the glazes.
I continued to refine the underpainting on the rest of the painting, as well as the finishing on landscape areas. I found a supplier of Lapis Lazuli pigment that I was happy with and repainted the sky once I had the new Lapis paint ground."
 (The Mona Project – about a year in.)
A Year of Refinements and Details
January 11th - "Continuing to build up shadows with glazes of color (mostly black and Italian umber) slowly!"
March 29th - "Closer and closer! More progress."
May 3rd - "I found an incredible new supplier of Lapis Lazuli pigment, Master Pigments, who grind their own pigment from raw stones and refine it according to Cennino Cennini's formula. The paint made from this pigment is AMAZING! I repainted the sky and started cleaning up areas of the dress. I've added in vermillion shadings in the face as well. I'll clean up SO much more in the final version of the painting. I also have glazed-in highlights on the chest and face with lead white. I'll continue to develop the painting as I go."


 (Progress photos of the Mona Project by Andy Schoneberg.)
Adding Finishing Touches
"I used a Dremel and wood chisels to cut two recesses for butterfly braces in the back of the panel. One of the recesses has a walnut butterfly glued in place. Linen canvas pieces have been glued into the other recess and along the crack in the panel. I also replicated some of the markings on the back of the original panel. The H and the number 29 are done with conte crayon and pencil, respectively, as well as the la Jaconde handwritten script at the top left of the back. There's a red stamp inventory marking on the lower right for which I created artwork, and a rubber stamp was made. Then, it was a simple matter of stamping the image on the back of the panel. There's also some printed text near the butterfly recesses. I Photoshopped artwork from a scan of the back of the panel and printed out the text. Then, I soaked the paper in strong coffee, dried it, and cut the strips to glue them on the back of the panel. Once the glue dried, I used an Xacto blade to distress the paper to match the original. 2" wide white gummed paper framing tape was applied to the back of the panel and distressed. The addition of the tape and drilling insect holes in the back should just about wrap up the back of the panel. The back of the panel was previously aged using a strong tea solution as well as a solution made from soaking steel wool in white vinegar."
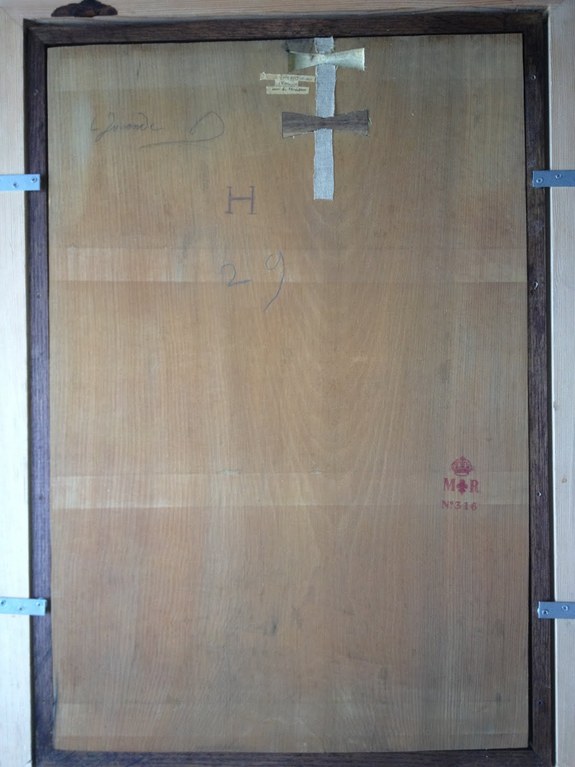
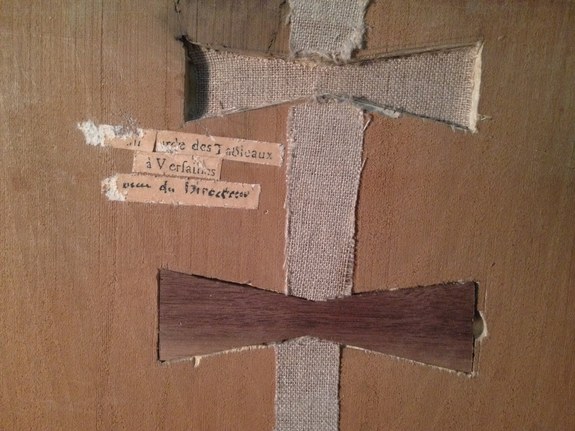
 (Meticulous to the extreme! Andy replicates even the detail on the back of the famous artwork.)
Aging and Gilding the Frame
"For the frame, I bought 23K gold leaf and applied it to the previously stained frame. I had also applied a thin, irregular coat of red bole under the leaf. I used water gilding to attach the leaf. Once the frame was completely leafed, I used steel wool and a burnisher to scrape and wear away the leaf to match the original frame. I printed out photos of the real frame to guide me on the antiquing. The painting, when framed in the flexible frame and the decorative frame combined, weighs in at 35 pounds! Crazy!"
- Andy Schoneberg (from his blog, The Mona Project)
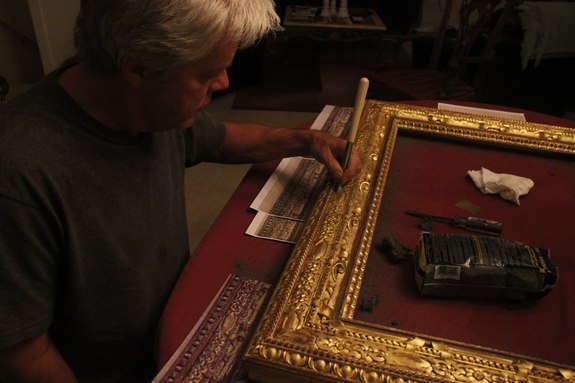 (Andy ages and gilds the frame, carved in poplar by Ian Agrell, an artist from Northern California.)
 (The complete, framed Schoneberg Mona Lisa -- a lifetime's passion realized.)
More from Andy Schoneberg:
- Monster Maker Interview (featuring the lovely Mona)
- Mastering Effects Disasters - Explode A Head tutorial
- Remote Makeup Application Part 1: Prosthetic & Kit Preparation
- Remote Makeup Application Part 2: Applying Prosthetics & Hairpieces
- Andy talks about Jurassic Park's Brachiosaurus
- Working on the “Scissorhands” from Edward Scissorhands
- Andy's IMDb Page