
How to Build an Animatronic Head Part 1 - Creating the Mechanical Underskull
Craig Caton-Largent
Learn how to build an animatronic head with master creature effects mechanic Craig Caton-Largent (Jurassic Park, Terminator 2: Judgment Day, Predator 2). In Part 1 of his 4-part course series on DIY mechanical characters, Caton-Largent teaches you how to create an epoxy & fiberglass underskull, the critical first step in building facial animatronics for your character creations.
This DVD is a 2-Disc Set
Curriculum
Materials
CLICK on the links below to find the materials you need for this lesson.
Some items might be harder to find, but a little internet scouring usually finds you everything you'll need.
Additional Supplier Websites Here: http://forums.stanwinstonschool.com/discussion/2904/parts-suppliers-for-animatronics-sculpting-molding-skin
FOR YOUR WORKSTATION
Headform - if you do not have a headform of your character, you can buy a generic one to use for this lesson
MATERIALS
Fiberglass cloth 6oz Heavy (2)
20min Epoxy
Plaster Bandage (for creating mold)4”x15” (3)
Mold Release
HEAD CORE
Water-based Clay like EM210 or WED
Clay modeling tools to cut clay, can even be plastic knife or butter knife
Disposable brushes for brushing epoxy (size will vary depending on your project)
Stir sticks or something for mixing epoxy
Disposable cups (paper or plastic) for mixing epoxy
Small bucket or any container to hold water for dipping plaster bandage
Paper towels
Krylon Crystal Clear spray (optional)
Disposable gloves (optional)
TEETH
Acrylic Resin Teeth: size 24
Jet liquid monomer to make gums (Davis Dental)
Jet powder
Key-To-Alginate fast set for molding (Davis Dental)
CHARACTER EYES
Eyes can be made from anything except glass - they need to be able to be drilled, cut and altered
SERVOS
Jaw Servo (Hitec HS-645MG)
Eyes Horizontal Rotate (Hitec HS-53)
Eyes Vertical Rotate (Hitec HS-82MG)
Eyelids 2 needed (Hitec HS-82MG) (2)
Brows 2 needed (Hitec HS-82MG) (2)
Upper lips 2 needed (Hitec HS-82MG) (2)
Mouth corners 2 needed (Hitec HS-82MG) (2)
Lower Lips 2 needed (Hitec HS-82MG) (2)
SERVO TRAYS
Birch Plywood 3/16 x 6 x 12
Birch Plywood ¼ x 12 x 24
#5 wood screws
MISCELLANEOUS
Eyebrow Wire 3/32” x 4:40 thread (Du-bro 6pack)
Eyebrow pushrod housing (Du-bro)
Ball Link Sockets 2/56 (Great Planes) (2)
Insta Cure cyanoacrylate 2oz
Insta Cure accelerator 2oz
Rod End (clevis) 2 pack
Dual Servo Horn #3342(Du-Bro) 2 pack
Goldenrod #507 .032” multi-strand cable
Goldenrod #508 .056” multi-strand cable (2)
E/Z Connectors 12 pack
Eye Lid Brass Strip .032” x ¼”
Eye Mech Brass Strip .064 x 1/4 brass strip (2)
Brass Strip .064 x 1/4 brass strip x 12”
Sand Paper 120 grit and 400 grit
Threaded Rod 2/56” x 12”
Threaded Rod 4.40 x 12”
Brass Rod 1/8” x 12”
TOOLS
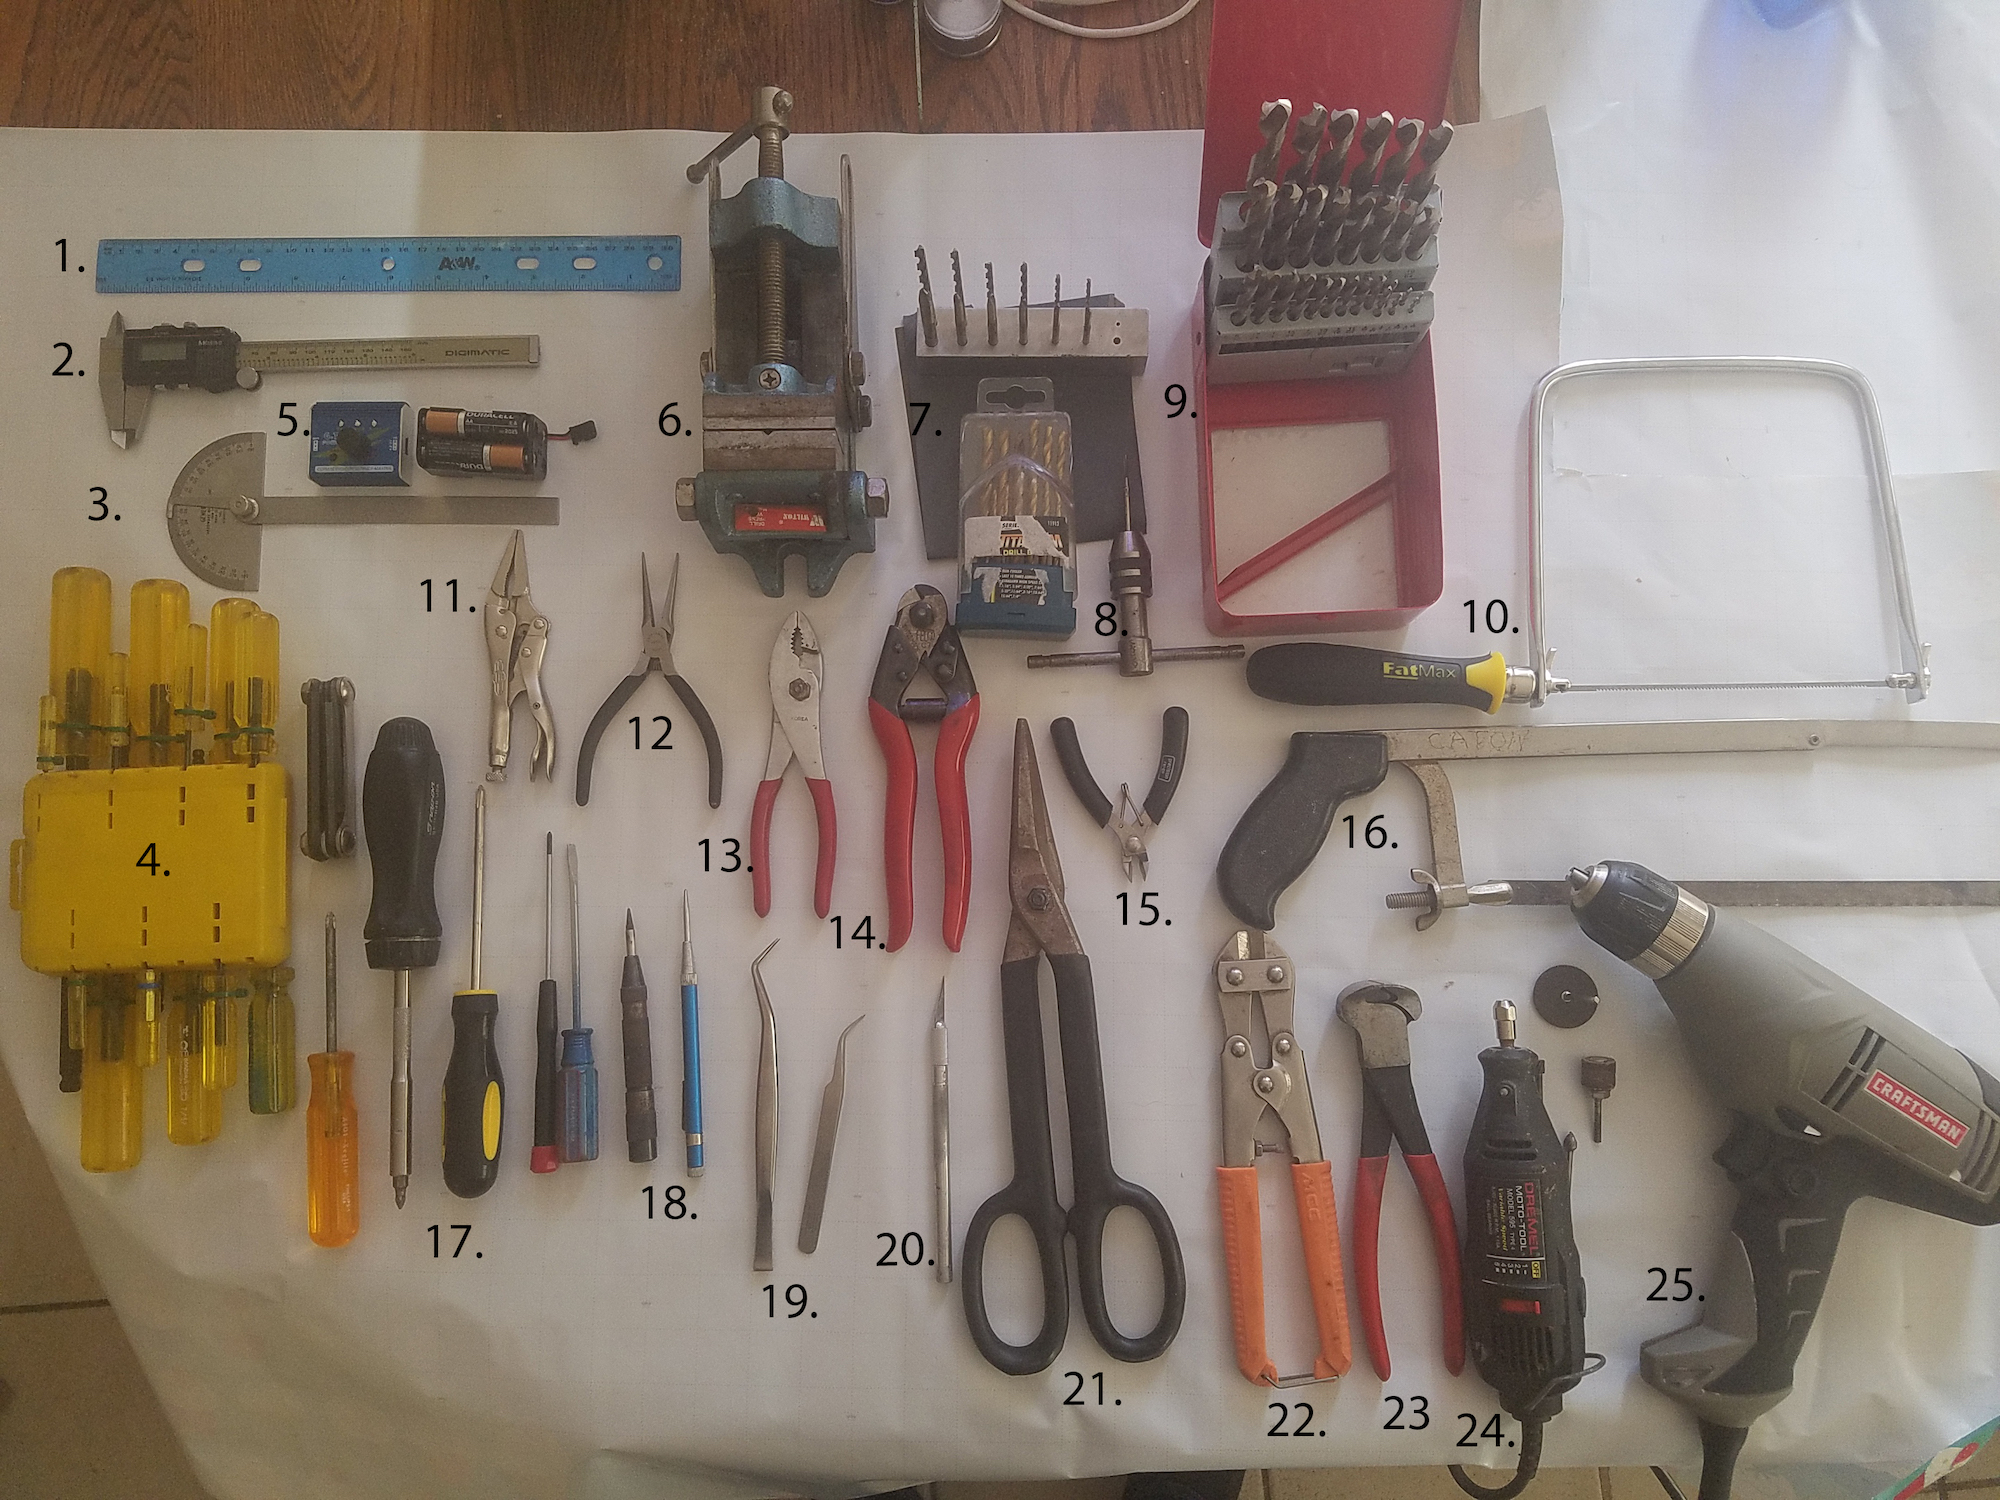
BITS & INDEXES
2/56 Tap and handle (8. in image)
Drill bits (you will only need some of the smaller ones) (9.)
CLAMPING, CRIMPING & GRIPPING TOOLS
Needle nose Vise Grips (11.)
Needle Nose Pliers (12.)
Pliers (13.)
Tweezers (19.)
Vise (6.)
CUTTING TOOLS
Automatic Center Punch (you can use a nail instead) (18.)
Coping Saw (10.)
Cable Cutter (14.)
Flat Cutters (optional) (23.)
Hack Saw (16.)
Side Cutters (alternate for Tin Snips) (22.)
Tin Snips (21.)
Wire Cutter (15.)
Xacto Knife (20.)
ELECTRONIC TOOLS
Servo Tester with Battery pack (super useful) (5.)
MEASURING TOOLS
Ruler (1.)
Digital Veneer Calipers (Your most used tool!) (2.)
Adjustable Protractor (3.)
POWER TOOLS
Dremel Tool with Sanding Drum, Circular Blade, and grinders (24.)
Drill Motor (25.)
SCREWDRIVERS
Screw Drivers Flat and Phillips (17.)
WRENCHES
Allen Wrench Set (Inch and Metric) (4.)
NOTE:
Craig will also be using a Table Top Drill Press, a One Inch Belt Sander, and a Scroll Saw. However, these can be substituted with an electric hand drill(or Dremel Tool), sand paper, and a coping saw, respectively
HEALTH/SAFETY PRECAUTIONS
When working with toxic and/or dangerous materials or tools:
ALWAYS read labels for appropriate use guidelines
ALWAYS wear a high-grade respirator
ALWAYS work in a well-ventilated area
ALWAYS protect your skin
ALWAYS wear eye protection
Artist BiographyCraig Caton-Largent

Get FREE Popular Course Content!
Enter your email for FREE access to content from 16 of our most popular courses.