

Roberto Suarez Recreates Styx’s Mr. Roboto
By Roberto Suarez
My name is Roberto Suarez, and I’ve been a costumer (or “cosplayer”) all my life, but my work has become much more professional-looking since 2003 when I joined the 501st Legion, an international fan-based organization dedicated to the construction and wearing of screen-accurate replicas of costumes from the Star Wars universe. Building up to my first convention attendance at Dragon Con that same year, I learned to work with Bondo putty, fiberglass, resins, and other tools. My other previous experience making molds was over 25 years ago for a ceramics class I took just after graduating High School.
One thing I noticed at Dragon Con (and many other conventions) is the range of different costumes--you don’t have to belong to a specific group. Often at San Diego’s Comic-Con International and Dragon Con, fans bring a big “secret” costume to showcase and amaze everyone. The opportunity to go beyond conventional costumes—Stormtroopers and the same heroes and villains seen year after year—sparked my interest in “other” costumes, an open window for my creativity. Over the years, I made some typical costumes… but I needed to make something that no one had ever seen, at least from my perspective.
I grew up in the 1980s, and the characters from those years are some of my favorites. I have many fond memories of characters that everyone who lived through those years would know, but that hadn’t been seen really at all among the cosplayers at today’s conventions. I came up with two ideas: the first was to dress up as Condorman from the 1981 movie of the same title. My Condorman cosplay ended up winning “Best Disney Character” at Dragon Con in 2012. My second idea was the robot character featured on the album art of the Styx record, Kilroy Was Here, and also featured in the video for the album’s biggest hit song, Mr. Roboto.
Jump To Section
- Researching and Learning by Doing
- Challenges Along the Way
- Creating the Mr. Roboto Costume
- Sculpting the Hands and Feet
- Lighting for the Mr. Roboto Helmet
- Mission Accomplished and Future Challenges
 (Stan Winston sculpts Mr. Roboto for a Styx music video. The character would become one of the most iconic pop-culture figures of the 1980s.)
Researching and Learning by Doing
It was a challenging choice for me, since there was little information available on the costumes. The project was the culmination of about two years' worth of research. I studied the video online and obtained a copy of the “mini-movie” that Styx used to play just before playing the song at concerts. I pored over screen grabs of the videos and analyzed each frame. Of course, the video quality was bad, but I had to make the best out of it for accuracy.
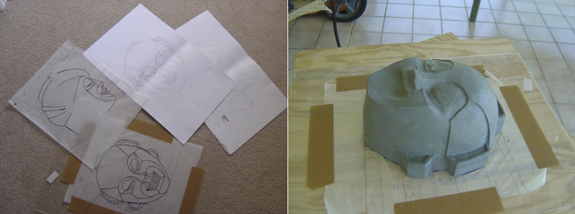 (Left: The initial drawings made from meticulous copies of album art. Right: Sculpt of the Roboto head, large enough to accommodate the wearer’s head inside.)
Challenges Along the Way
After making printouts to scale (definitely NOT pepakura), I took measurements of my own head and adjusted the size of the helmet so I could wear it over my head. I then used the measurements to make a clay sculpture. This would allow me to take molds and make the castings using vacuforming. Not having a vacuum machine, I taught myself the art of vacuforming using my kitchen oven. There were many bumps along the way. I learned the important difference between latex rubber and silicone rubber. My molds were made out of latex since, working on a budget, it was the only material available, but latex tends to reduce as it dries up, so I had to allow for that. I made the vacuum table plugs out of “HydraStone” (a kind of plaster used to make molds for ceramics), simply because it was cheap and easily available for me.
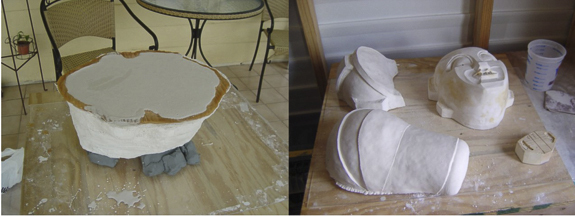 (Work in progress: (Left) The front part of the helmet waits for demolding. (Right) Each cast resin part of the helmet is now ready for vacuforming.)
 (Left: A homemade plate ready for vacuforming. Right: The parts of the plastic mask are now finished and ready for assembly and paint.)
Other materials I used included perforated plastic for the ears, PVC pipes to make part of the ears (I made molds and cast the parts in resin), Bondo brand automotive filler, Bondo brand spot glazing putty, and, of course, nearly all grit grades of sandpaper.
Creating the Mr. Roboto Costume
The suits used in the video at first looked to me like they were made from foam rubber, but watching every video so many times over-and-over-and-over, got me to the point of thinking that it was a foam/cloth material like you might see used for car roof interiors. I used a pattern for a Civil War Era uniform as the guideline for the shape, though I made some custom changes, especially in the shoulders, to better match the look of the suits in the video.
 (A Civil War costume pattern provided the basic shape of the Mr. Roboto costume, with some custom alterations.)
Sculpting the Hands and Feet
The most challenging part of the costume to construct turned out to be the gloves and boots. Instead of sculpting the entire glove and then molding it, I used a process by which I sculpted one half, molded it, then sculpted the bottom half on the already completed side. I had no experience with this and had to work it out as I went along. For the boots, there was no information available and no good pictures; all I could see in the video was a silhouette. It seemed to me at the time that they may have been soft “moon boots,” but I was not sure, yet I sculpted them in that way.
 (The two-sided sculpture for the Roboto gloves, the sculpt for one-half was created on top of the already molded sculpt of the first half.)
Lighting for the Mr. Roboto Helmet
I installed LEDs on the helmet, even though I have no knowledge of electronics—side note: since I started this project, I’ve been trying to learn more about basic electronics—but for the purposes of this project, these LEDs are only for display.
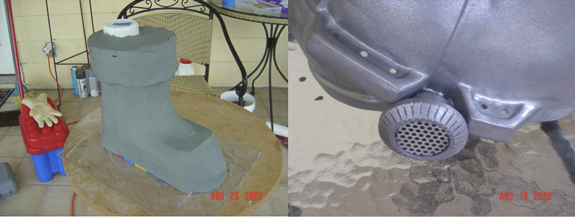 (Work in progress details of (Left) the boot and (Right) the painted helmet showing the LED lights.)
Mission Accomplished and Future Challenges
Ultimately, I’m proud of how it turned out, despite having to create the whole costume on a trial-and-error basis, making parts, and slow progress over time. It was worth it. I look forward to making some small changes in the molds so that I can wear and present the costume again next year even better. Knowing that Stan Winston—the creator of so many great 80’s icons—created the original Mr. Roboto, it was an honor making something that Stan Winston Studio created years ago, and I was happy to be able to honor Styx and Dennis DeYoung in the process. In the meantime…for my next challenge, I’m thinking now about making an ULTRAMAN costume.
 (Roberto Suarez wears his completed Mr. Roboto Costume.)
Feel free to look at all the pictures of my progress with the costume in detail, including the music video, and the Kilroy “Mini-movies” in the link below.
http://ImageEvent.com/darthvader1/secretprojectfiles
Thanks!
Roberto Suarez