

Creating a Full-size T-Rex Head
Last lesson I wrote about, the keyword was “manly.” I used that word frequently in my descriptions because, frankly, it just perfectly summed up the material for me. This week we begin another journey with MAKE A DINOSAUR: T-REX FOAM FABRICATION Part 1, and boy oh boy, did another key word come immediately to mind…
The keyword for this lesson is BIG.
Jump To Section
- T-Rex Foam Fabrication with Ted Haines
- Ted Haines, a Master Monster Fabricator
- Using Various Types of Foam
- Taking a T-Rex Head from Design to Execution
- Patterning Your T-Rex Creation
- Building a Big T-Rex Head
- Completing the Broad Forms of a T-Rex
Everything about it is big. The idea is big. The subject is big. The materials are big. The amount of time spent on it is big. Even midway through the lesson, the locale had to change because the subject was so big. This whole thing is just big. Big, big, big. And lucky for us, in this case, bigger is better. Because this big journey is simply incredible. Oh, and did I mention it was big?
T-Rex Foam Fabrication with Ted Haines
This is part one of a three-part expedition into the complete construction of a T-Rex head. Part one will mainly showcase the origins of the character as well as the construction of the initial structure and framework. Part two will continue the process and introduce a range of fine texture techniques in foam. And finally, part three will tackle the painting, final detail, and finishing work. All together, this is a massive undertaking but an absolutely fantastic lesson through the world of foam.
Ted Haines, a Master Monster Fabricator
Here, we’ll see Ted Haines work his magic. Ted has been working with foam since he was a kid. Back then, he didn’t even know it was a career or a trade; he just liked doing it. He even discusses how he didn’t actually know what he was doing was “foam fabrication” until someone told him. Because of this lifelong passion for working with this specific material, Ted is the perfect man to teach this lesson.
 (Master monster maker and creature fabricator Ted Haines works on creating a basic shape of a T-Rex head using foam.)
Using Various Types of Foam
We’ll see Ted start by giving a thorough introduction to the different types of foam. He will guide you through foams with all variations of thickness, softness, and texture. While one type is good for working small and carving, another type is much better for larger-scale application and construction. Luckily for us, in this lesson, we’ll see him work with a few different kinds.
 (Ted Haines describes the different types of foam and explains their best uses.)
Taking a T-Rex Head from Design to Execution
As far as the design, Ted starts in Photoshop. This is where his initial character is conceived. Here, from this drawing, comes the sculpting. Working with a softer but thicker mattress foam, he begins to carve his design at ¼ scale. From rough cutting to refining, to smoothing and sanding, all the steps of basic sculpture are on display here, only with foam instead of clay. Happy with his creation at this stage, he moves on to the next stage of making it larger.

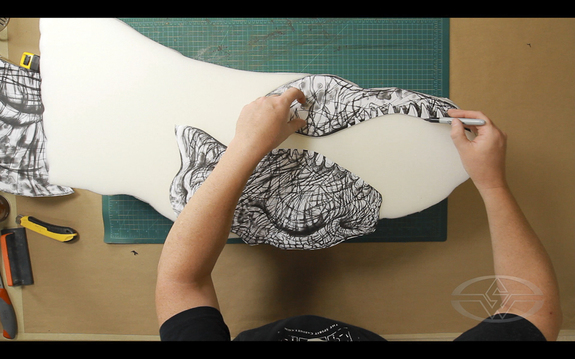 (Top: A T-Rex design in Photoshop. Bottom: Ted Haines outlines the features of the T-Rex’s face onto the foam.)
Patterning Your T-Rex Creation
Ted patterns his creation meticulously, making sure to include the tiniest details. He’ll explain and show how fabric darts, notch marks, and labeling are all necessary pieces of the puzzle. After cutting out and creating his patterns, he blows them up to full scale, thus creating duplicate patterns at a much more massive size. He uses these new patterns to cut out his shapes on the firmer L200 foam. And now with all his new pieces cut, he’s ready to give them form.
 (Ted Haines patterns the foam.)
Building a Big T-Rex Head
Using the darts for volume, Ted shows how he uses glue to construct the piece. As the shapes slowly form together, the massive T-Rex head begins to come to life. And yes, as previously mentioned, it’s BIG. Once the volume is formed and it’s fully constructed, the piece is so large that not only does a large wooden stand need to be created, but a complete change of venue is also necessary to easily fit it all.
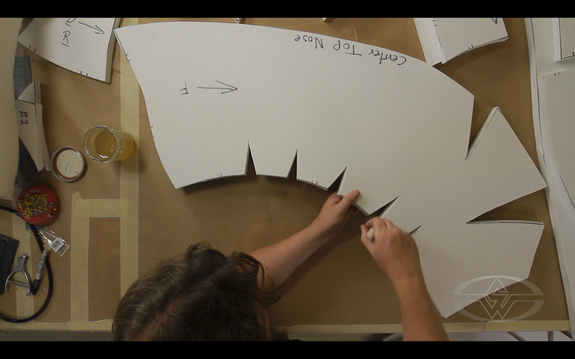 (Ted Haines begins constructing the larger shapes to build out the T-Rex piece.)
Completing the Broad Forms of a T-Rex
From here, after some repairs to the form, some interior strut installation, contour addition such as eye sockets and cheekbones, and a whole lot of tooth sculpting (40 of them!), the initial structure is pretty much complete, and thus part one comes to a close.

 (Top: Ted Haines completes the broad forms of the T-Rex. Bottom: The T-Rex piece is ready for the next phase.)
Seeing where we’ve come in this video is a thing of beauty, especially seeing someone work at this large of a level. But trust me, as awesome as it looks right now, just wait until you see parts two and three. This is one Jurassic expedition you’ll definitely want to fully complete.
To check out the FULL LESSON, just click here: www.stanwinstonschool.com/videos/make-a-dinosaur-t-rex-foam-fabrication-part-one
-Jeff Dixon
WATCH THE “HOW TO MAKE A DINOSAUR” COURSE SERIES WITH TED HAINES:
How To Make A Dinosaur - Part One: Design, Foam Carving & Fabrication
How To Make A Dinosaur – Part Two: Carving Teeth, Adding Detail & Texture