
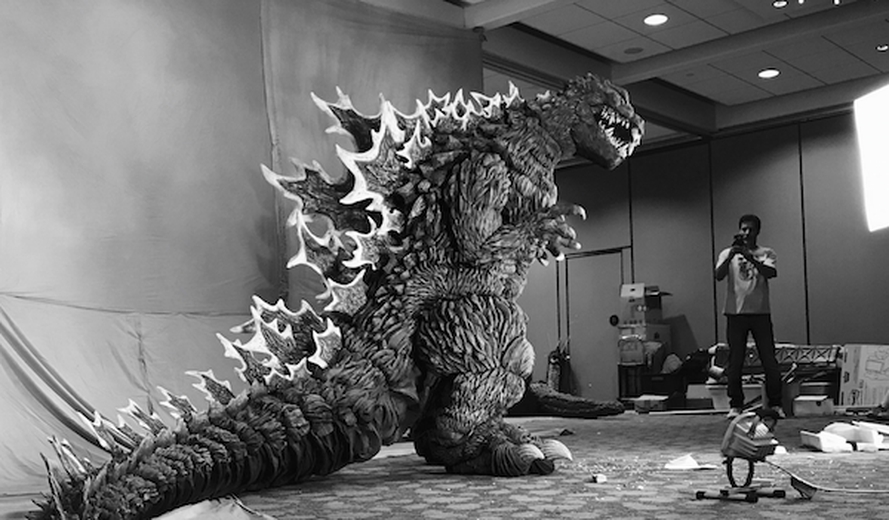
Krystopher Baioa’s Lifelong Love for Godzilla
Hello, fellow artists! My name is Krystopher Baioa, I moved to California in 2008 from Wisconsin to pursue a career in monster-making and monster-performance. My exposure to the world of practical effects started very young when I first discovered both Godzilla and Jim Henson’s Dinosaurs. It was love at first sight. As a child, I’d have my mom tie a jump rope around my waist that would drag behind me like a tail, and I’d stomp around the house as if I were Godzilla. At twelve years old I was inspired to make my first of many kaiju suits after witnessing the costume contest at Godzilla Fest in Chicago. In my teen years, I’d volunteer at a local haunted event every Halloween season, where my love for horror, SPFX, and monsters expanded. This habit carried over into my years in California, where I would become a monster every Halloween season at Knott’s Scary Farm (a tradition I maintain to this day).
Jump To Section
 (Krystopher Baioa with one of his early Godzilla creations.)
In California, I started working in foam to fabricate smaller Godzilla heads/statues. These explorations in foam led me on a self-taught sculpting journey with different clay mediums. Eventually, I developed enough skill and at last had an opportunity to build a complete Godzilla suit. The rest, as they say, is history.
Creating Fusion Godzilla
My build started with creating a leg pattern off of a Godzilla figure. I flipped the pieces to get the mirror image for the opposite leg. Then I created an upholstery foam prototype for safety before committing to L200 foam for the final build. I glued everything together using barge glue.
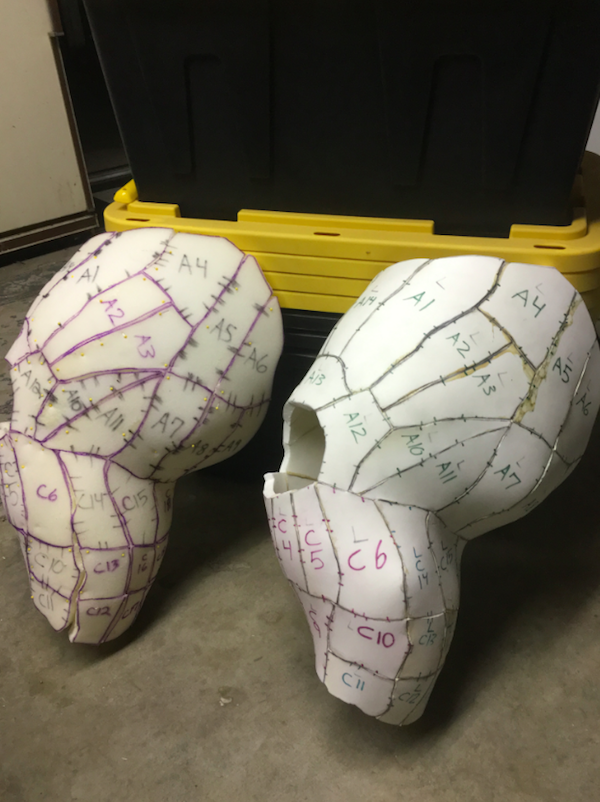 (Leg prototype made out of foam (left) next to its mirrored one (right).)
I made the soles of the feet from layered L200 foam with upholstery foam for the forms. I carved the toes out of L200 foam and used a dremel for detailing. I made the ankles from rings of upholstery foam and used spandex for flexible walking.
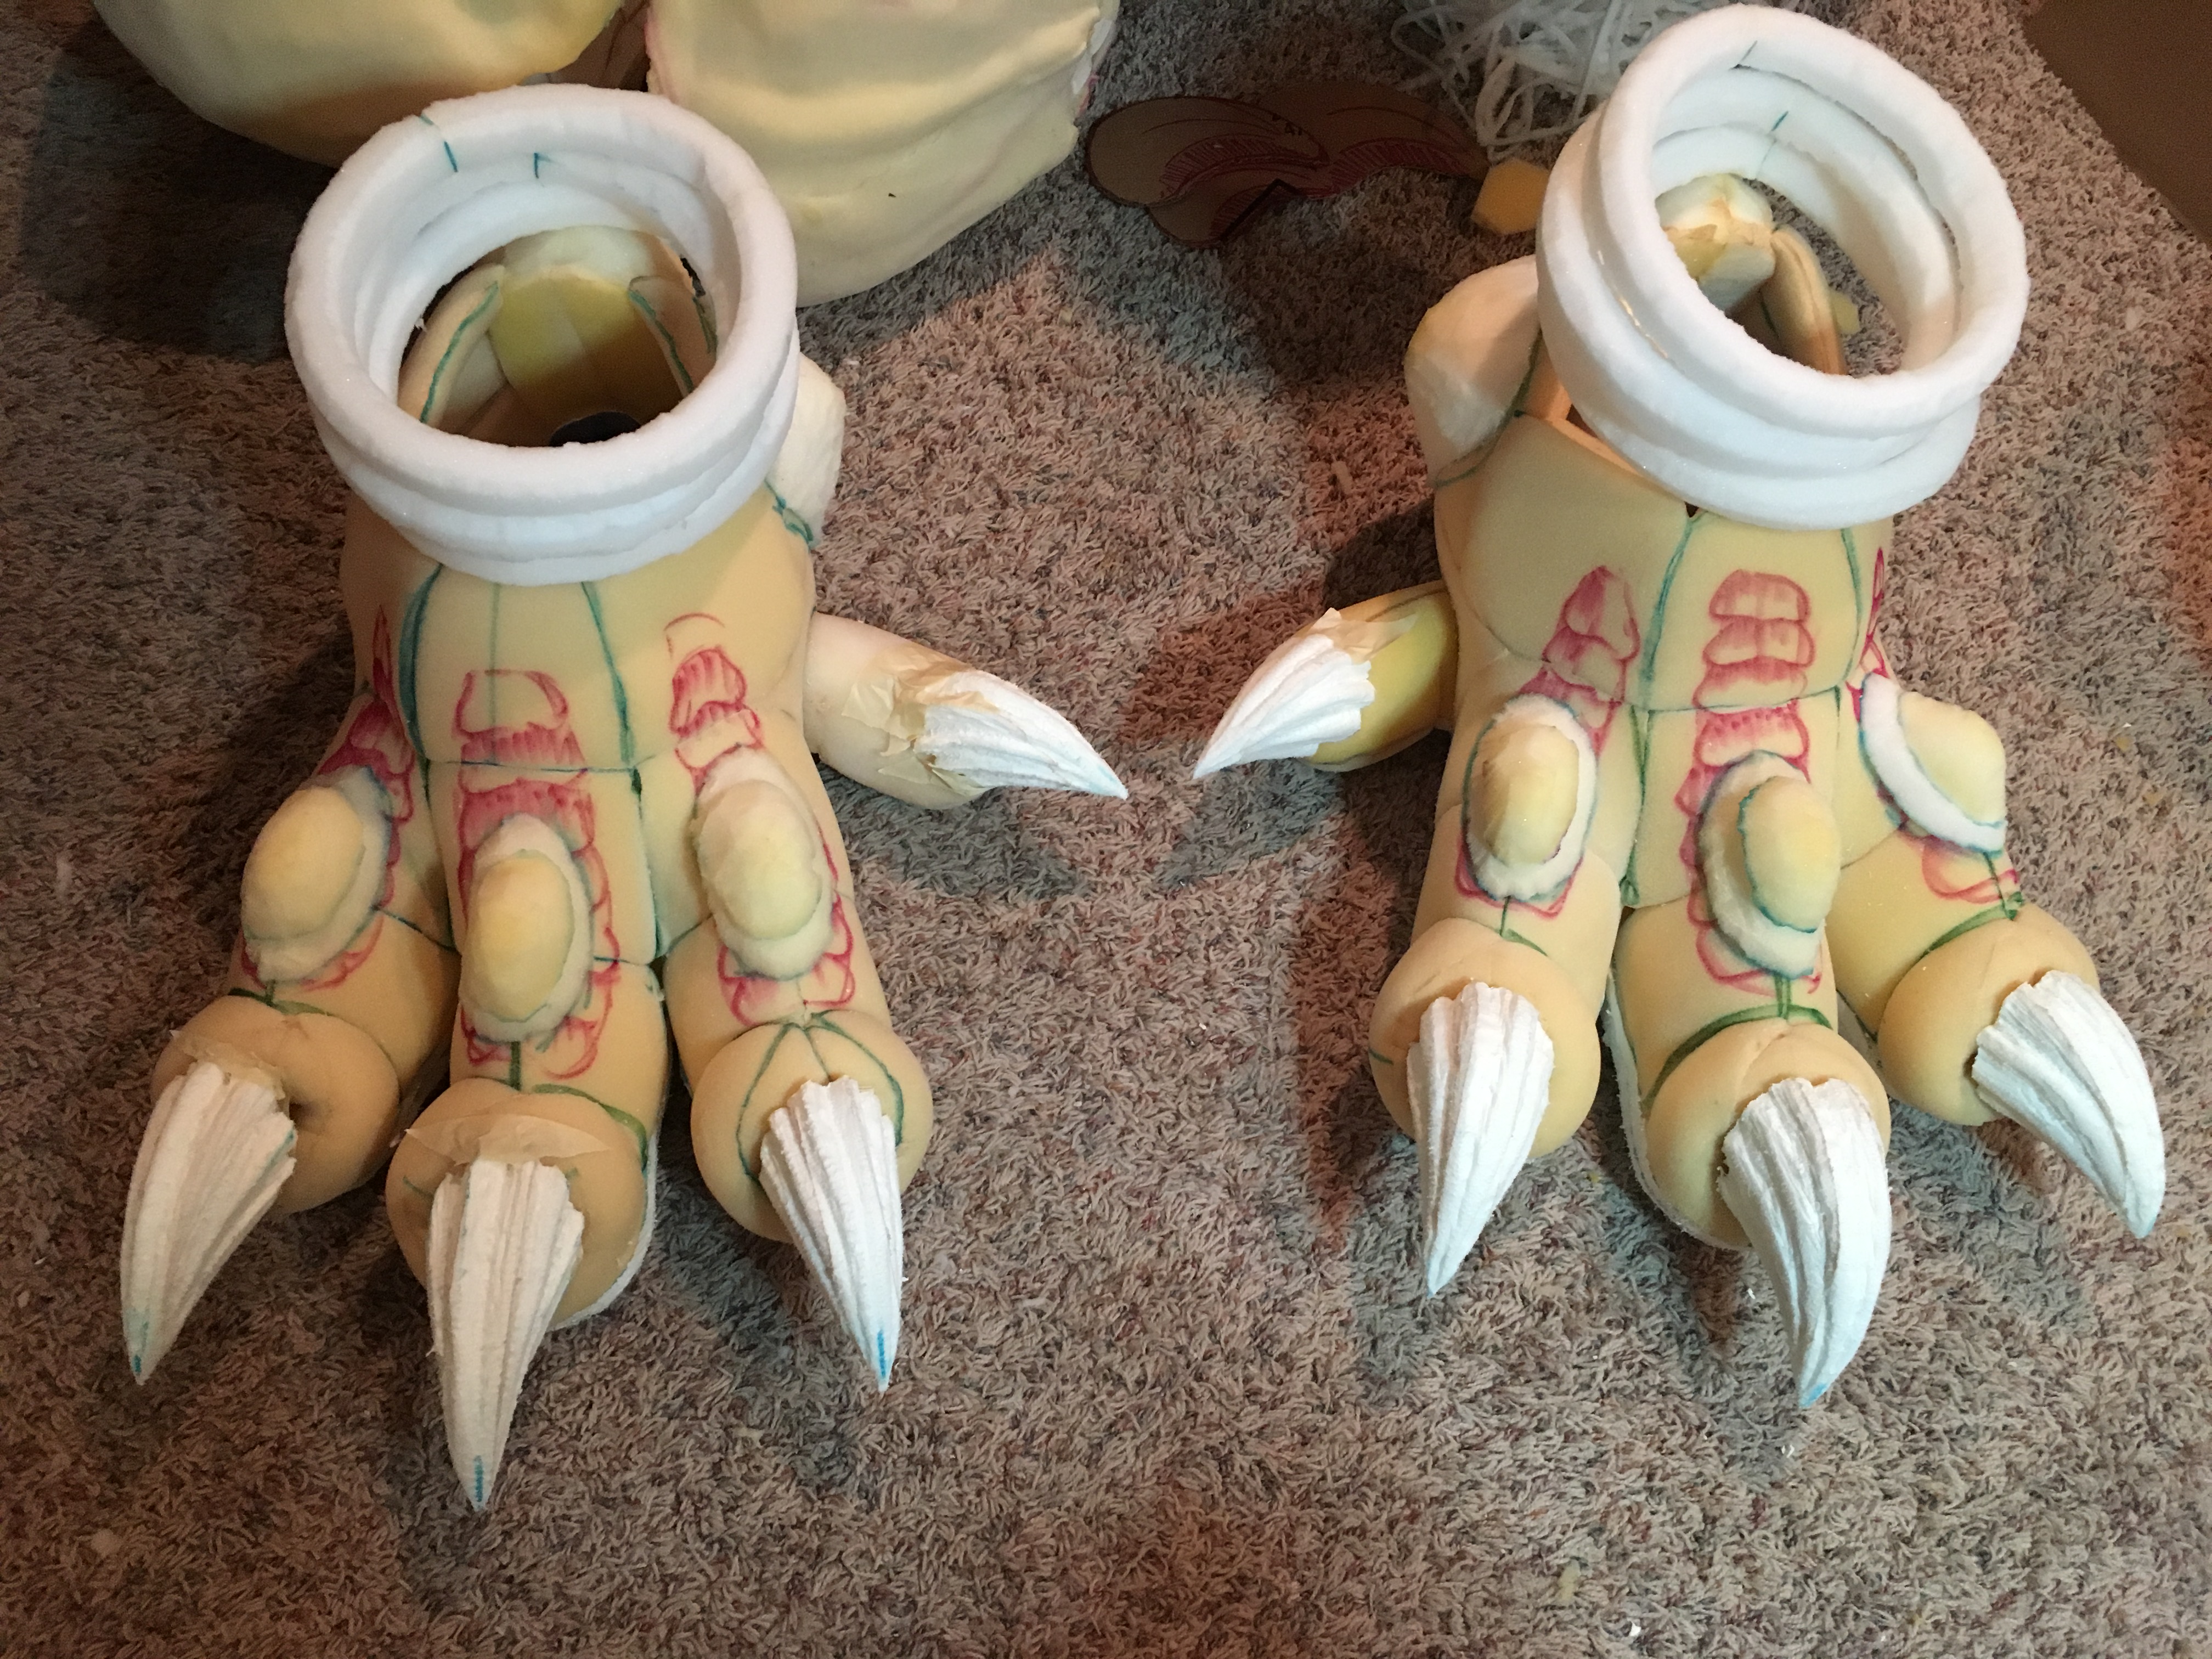 (The work-in-progress feet of Fusion Godzilla showing the carved toes and built-up foam.)
I carved ridges into the toes and then pressed wrinkles down around the toes. I constructed a "diaper" piece to serve as the connection point for the legs and body which I bridged together with spandex. I conducted several suit dress tests to ensure functionality.
 (A suit dress test in progress. At this stage, according to Krystopher, "The torso still has lots of bulking out to do so it won't be so Shin Godzilla-like.")
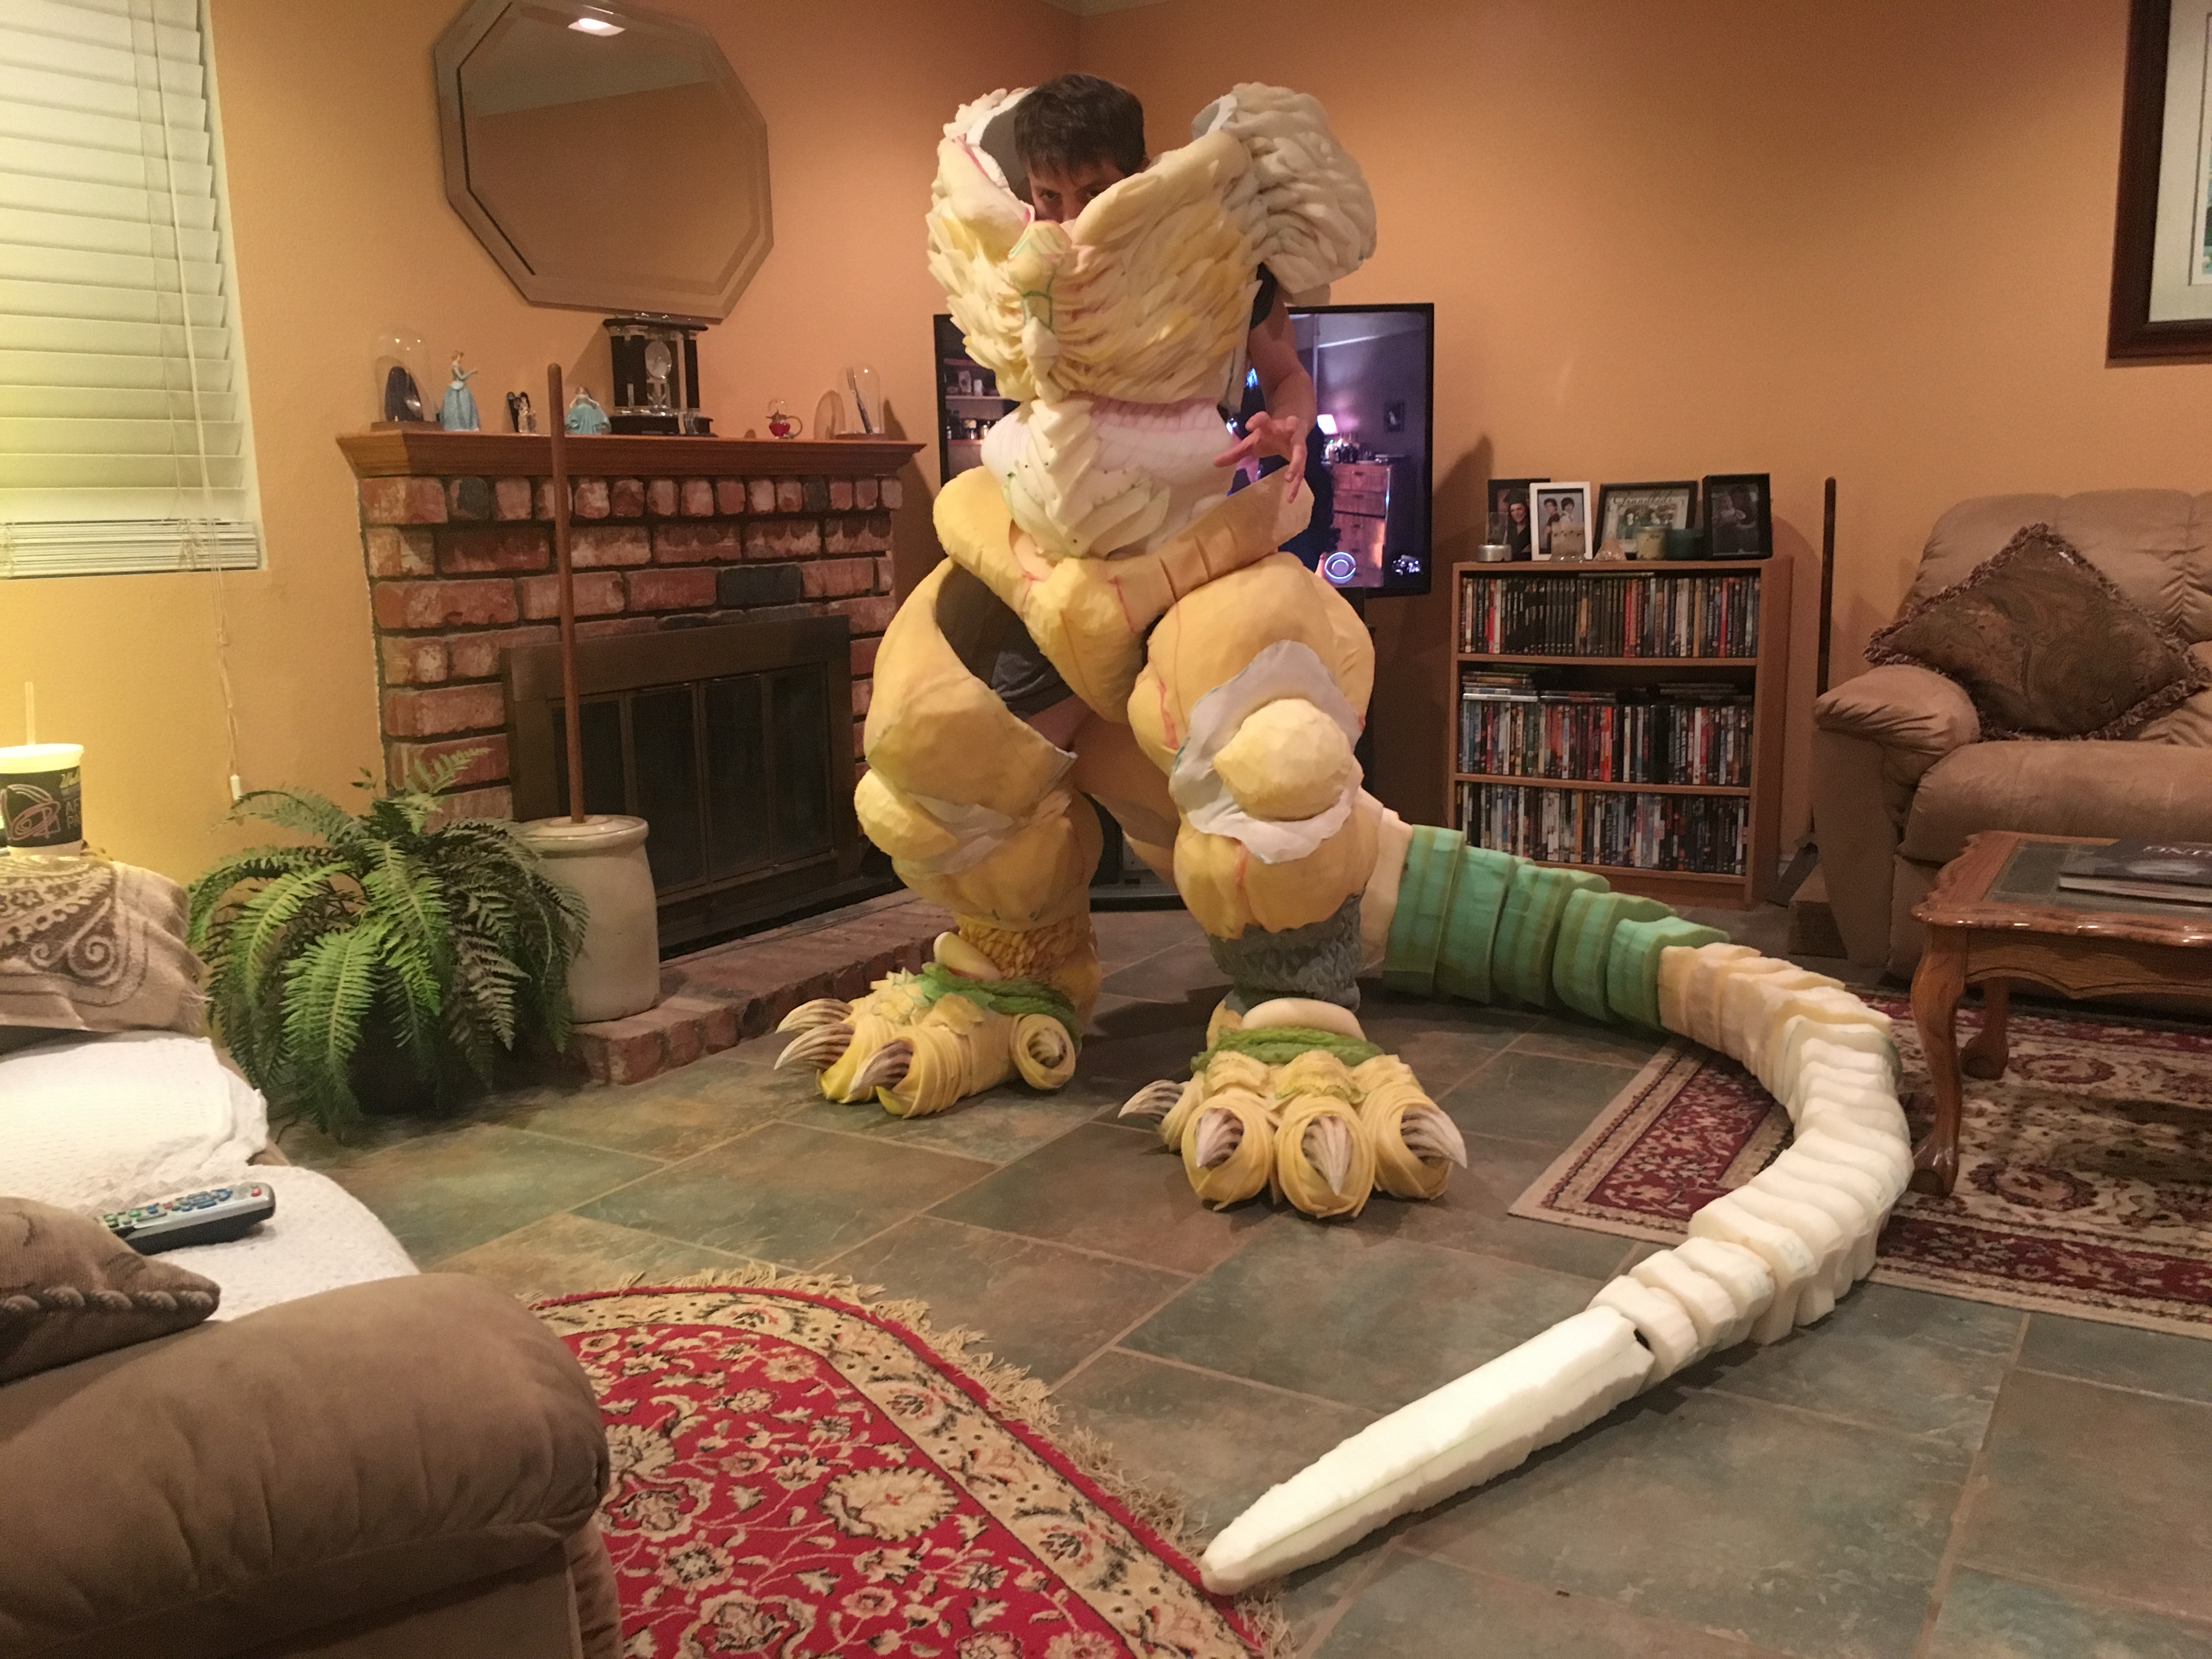 (Another suit dress test, here expanded with the tail and torso pieces. Krystopher notes: "The legs look a tad out of proportion only because they haven't been 'skinned' with scales yet which will bulk them out.")
I drew the dorsal plates first on paper, then traced them onto two halves of L200 foam. I cut the two pieces at a bevel so that they met at a smooth seam held together by barge glue. This gave me the needed bulk, while still making the dorsal plates hollow and lightweight. I used liquid latex mixed with flour to create the bumpy texture.
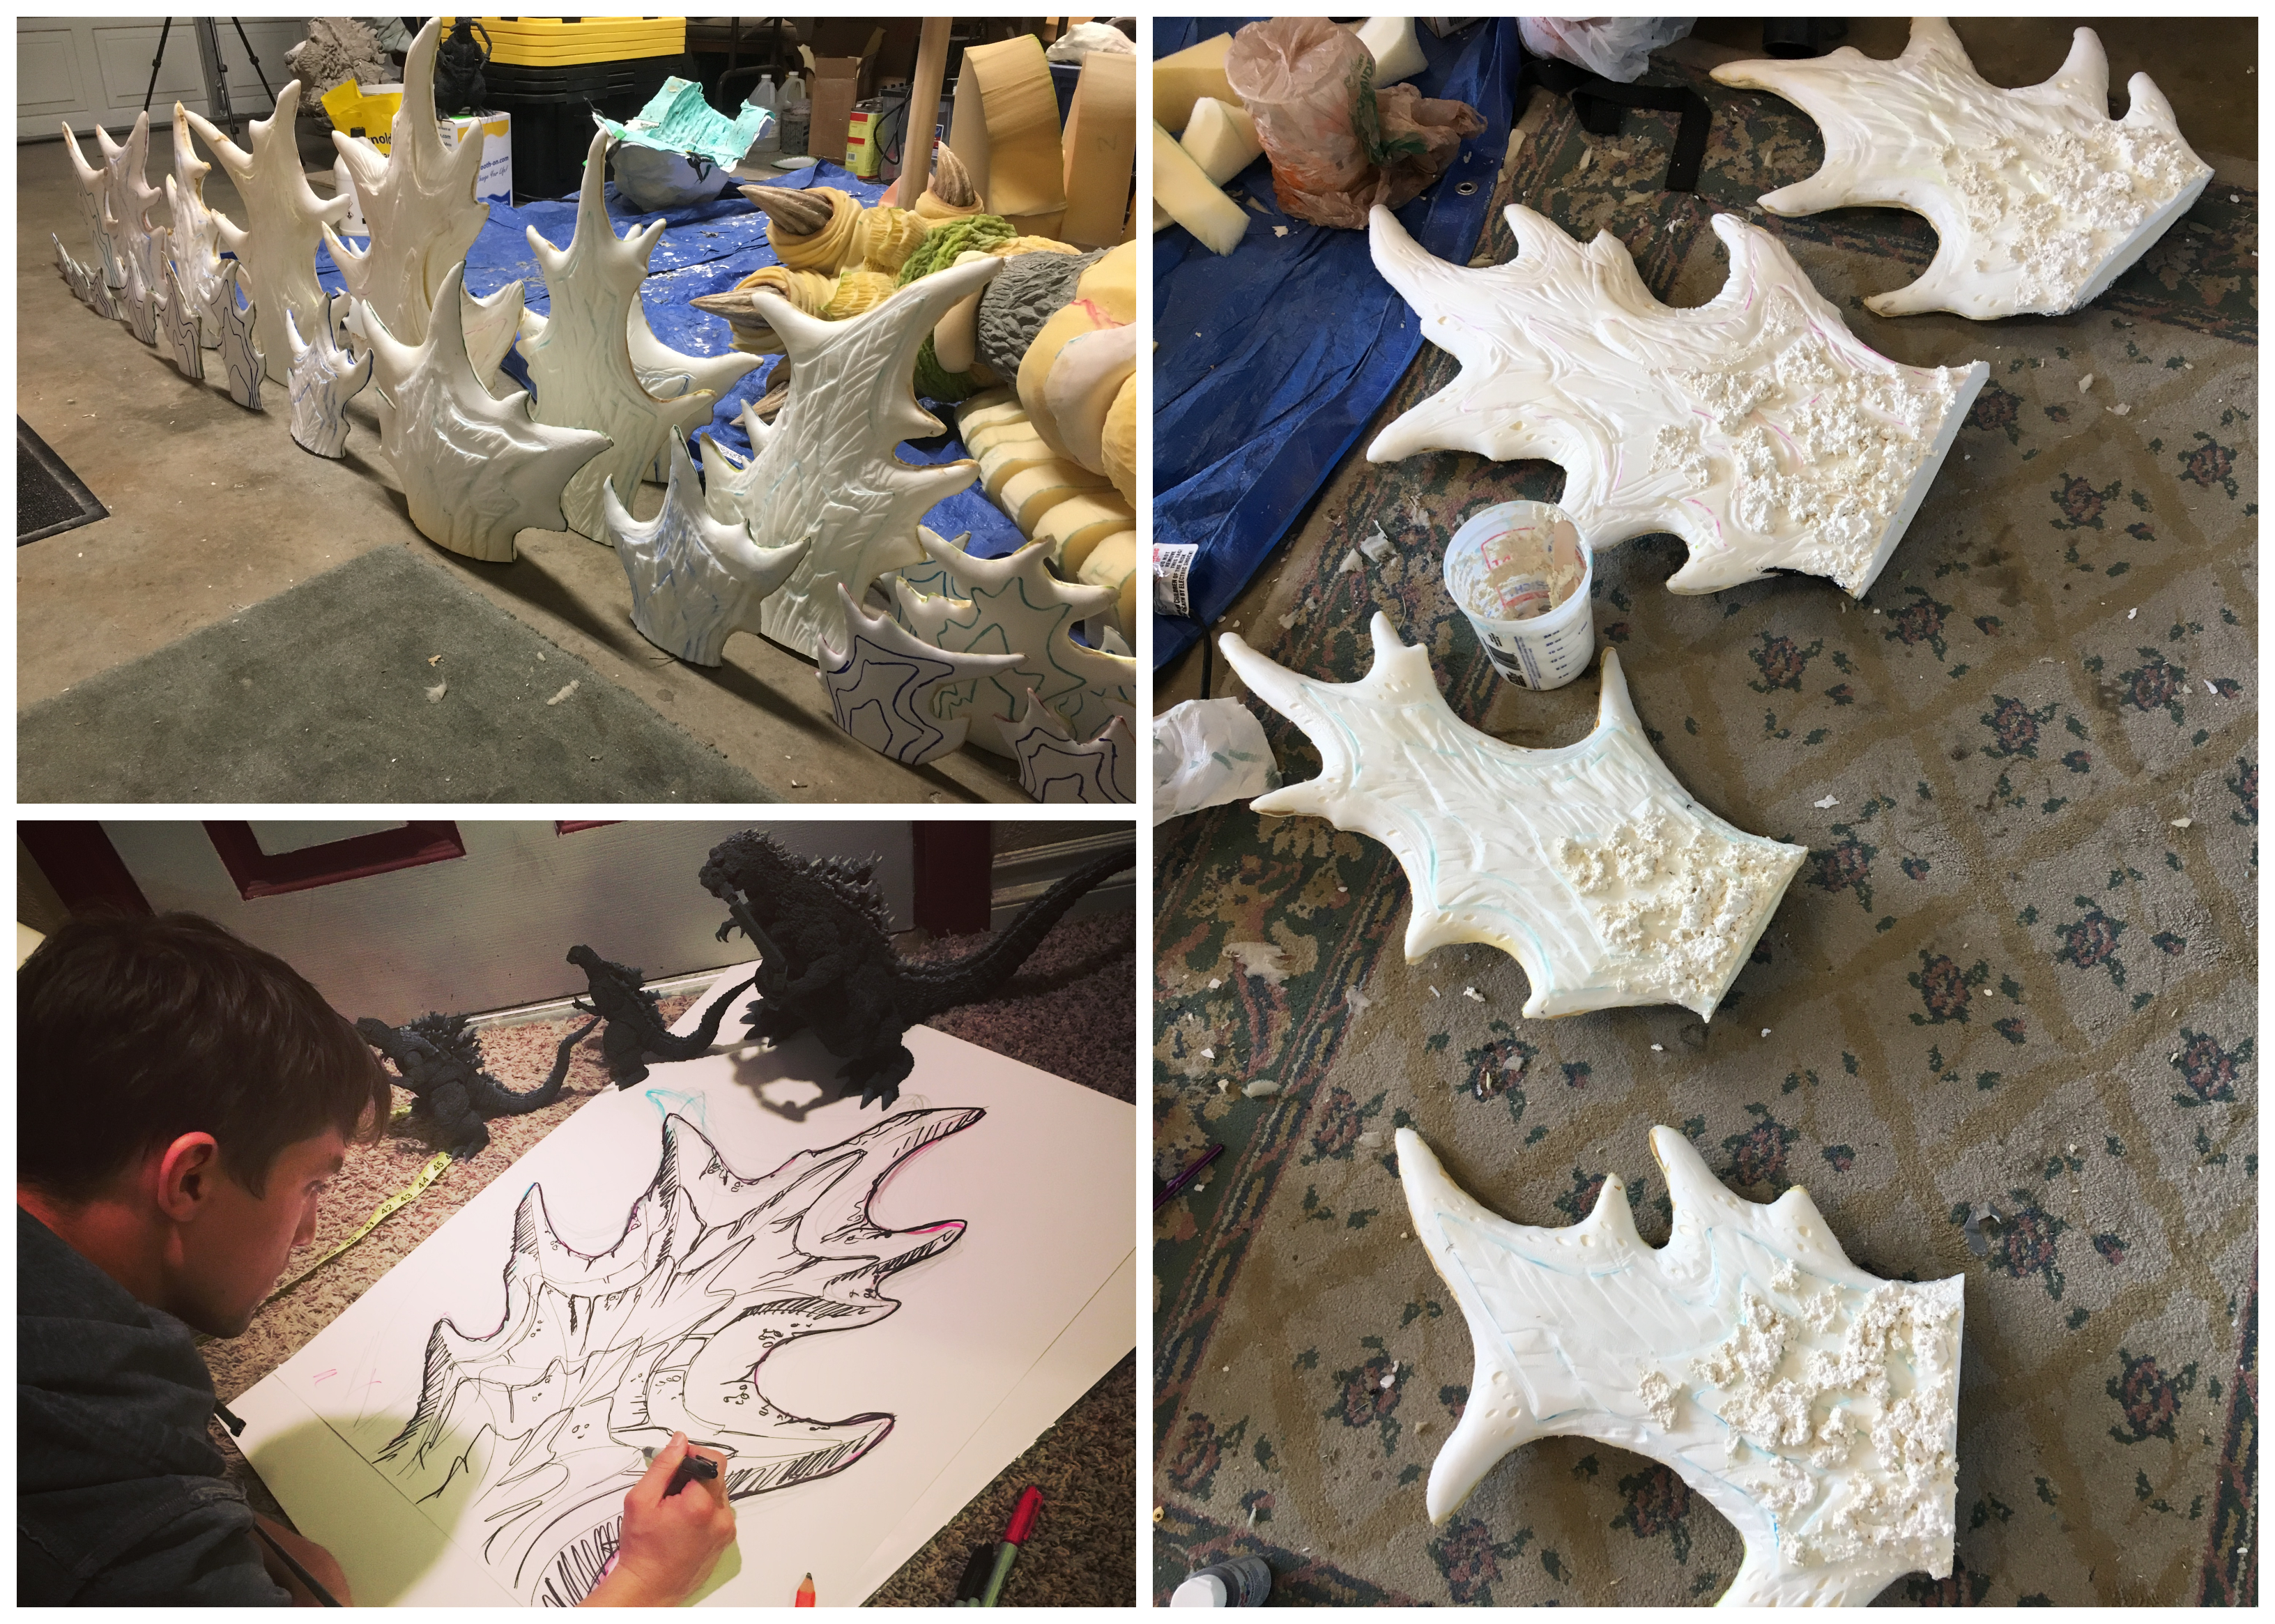 (Progress images showing the dorsal plate creation process.)
I made the tail from circular slabs of upholstery foam with vacuum hosing threaded through them. Then I wrapped the tail in spandex and individually glued on each scale. For the detail on the underside of the tail, I used 1/8" foam pinched together with glue to create skin folds. Buckles I installed at the base of the tail feed through the suit and connect around my waist when I'm in it.
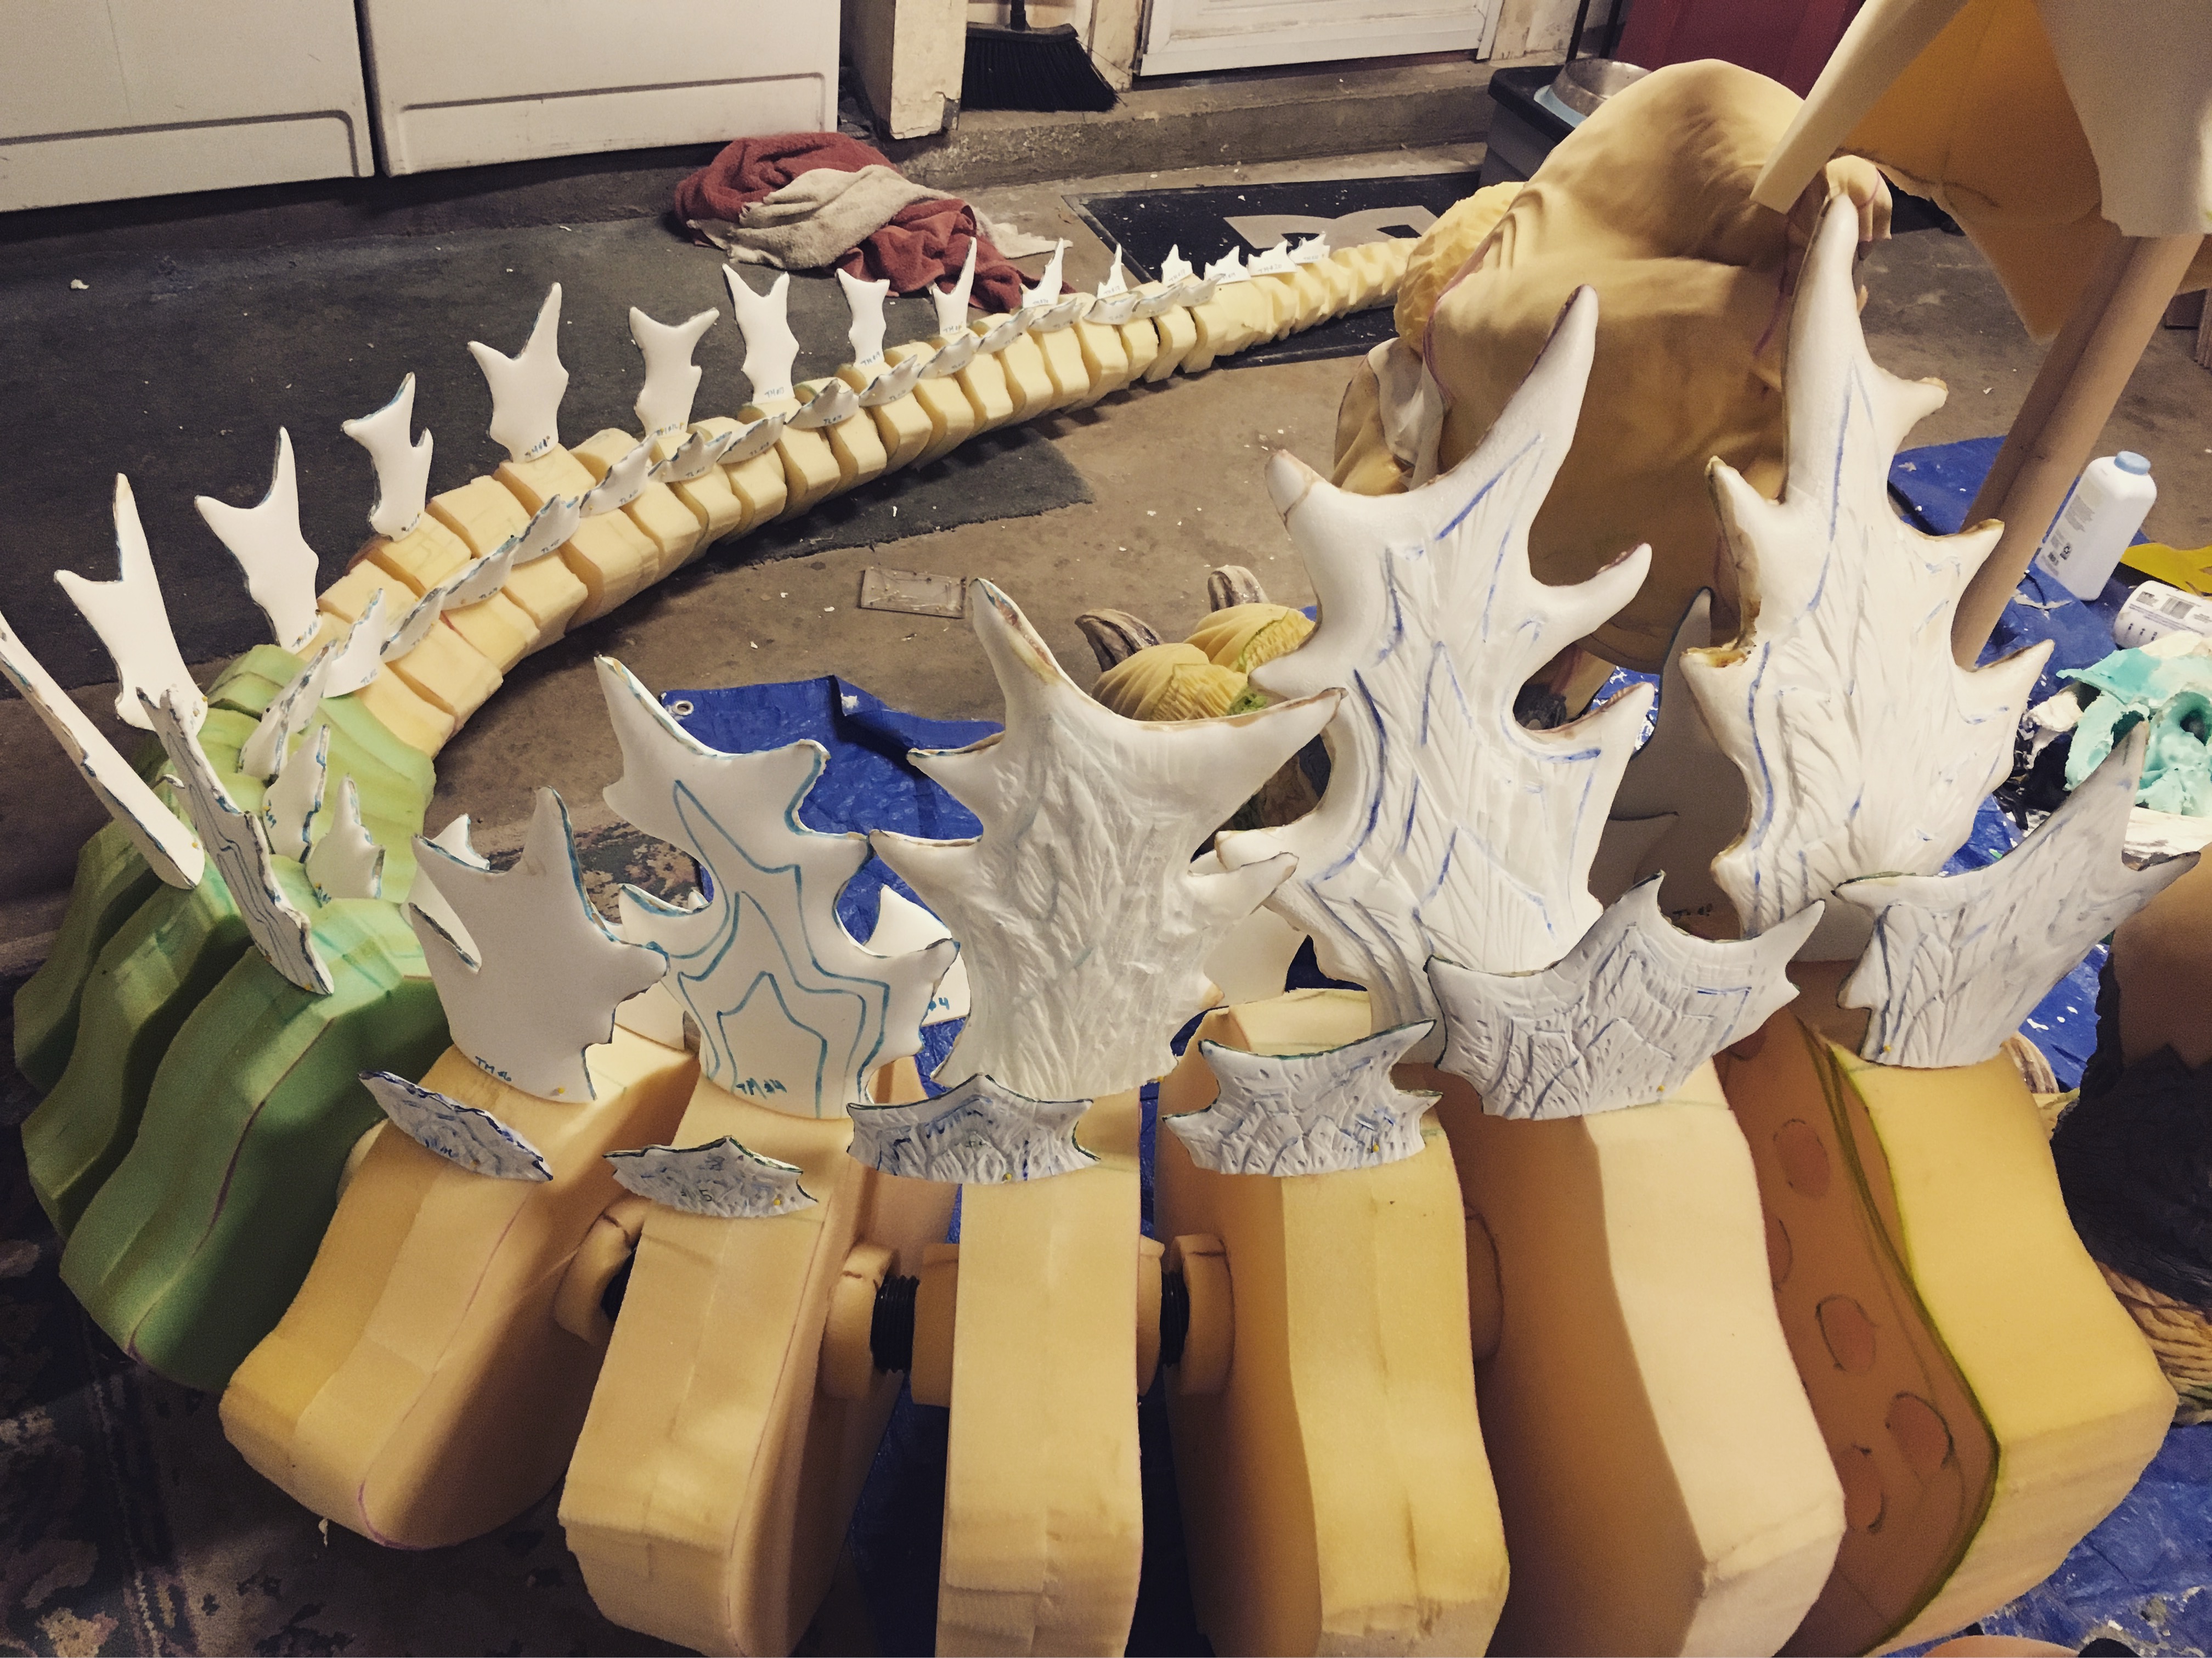 (A placement test of the tail dorsal plates, before the tail gets its final spandex wrap.)
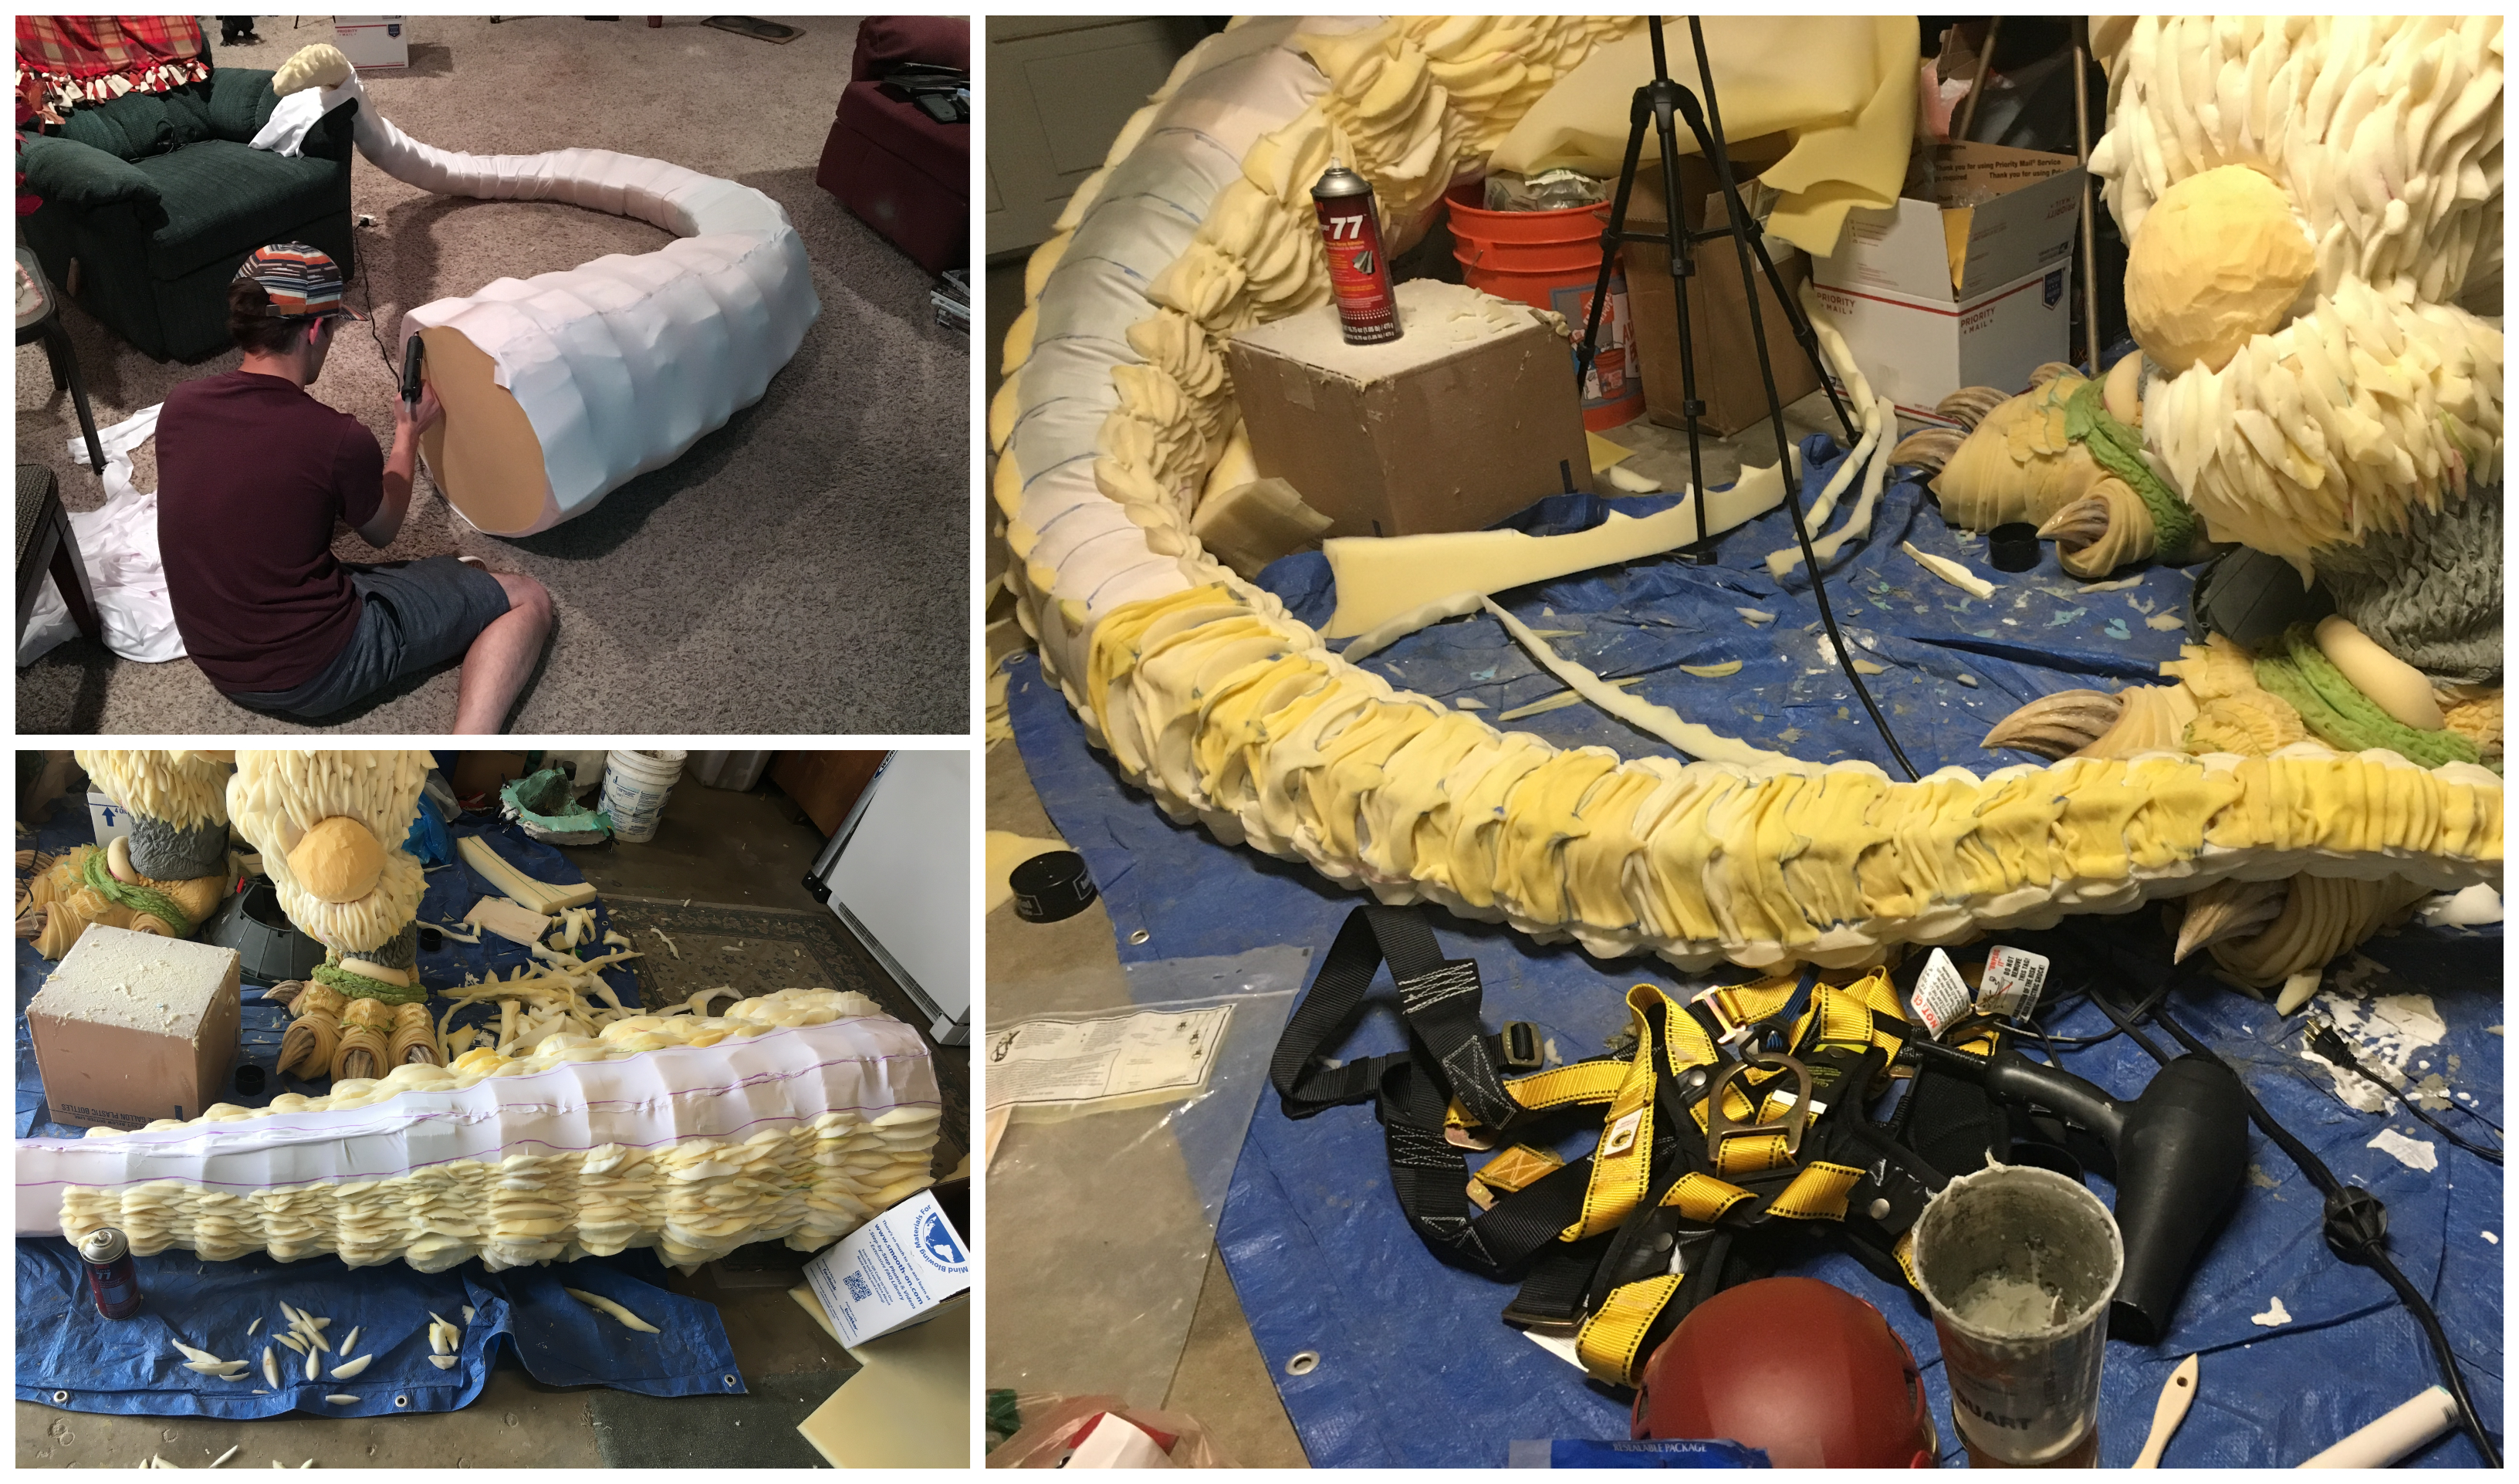 (Photos showing the tail wrapping and defining process. The tail wrap required four yards of Nylon Spandex.)
Defining the segments on the tail was a bit tricky and took a lot of scales and time but paid off in the end. I sculpted the head out of WED clay then made a silicone mold and cast it out of latex. I built up strips of paper towels in layers with liquid latex to give the cast some structure. I sculpted the gum palates separately out of Monster Clay and used Super Sculpey for the teeth. I used fiberglass under the skeleton as hard-surface base over which to glue the latex skin. A PVC “spinal cord” connects down into a socket near my chest (like a flag bearer might wear). This supports a roofing harness which is the connecting point for every buckle in the suit. Completing the head, I used clear Christmas ornament halves for the Fusion Godzilla's eyes; then I coated the teeth in epoxy to give them a realistic shine.
 (Photos showing the sculpting, casting & molding process.)
Justin Caldera helped me to detail Fusion Godzilla's head in order to make it a little more mold-friendly. In the photo above you can see where I created some neck rings and rigged them up in a temporary way to show the eventual space the neck would occupy in the suit.
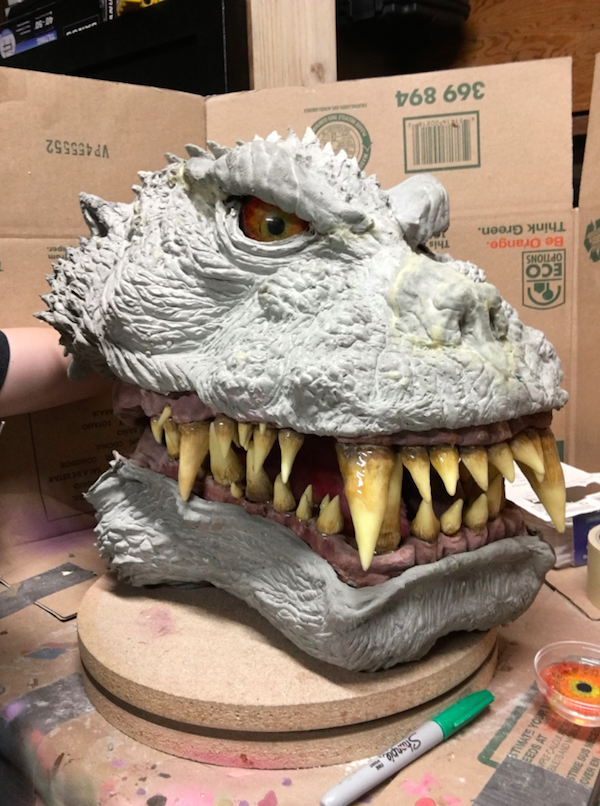 (A close-up of the Fusion Godzilla head.)
I had to anchor the larger dorsal plates into the suit with wooden dowels. After all the dorsal plates were firmly attached to the suit, I coated the entire suit with several coats of 1633 Foam Lock. This allowed me to seal the pores in the foam so that it didn’t soak up the liquid latex to be painted over the suit. The result was a finish that wasn't too heavy and didn't waste materials.
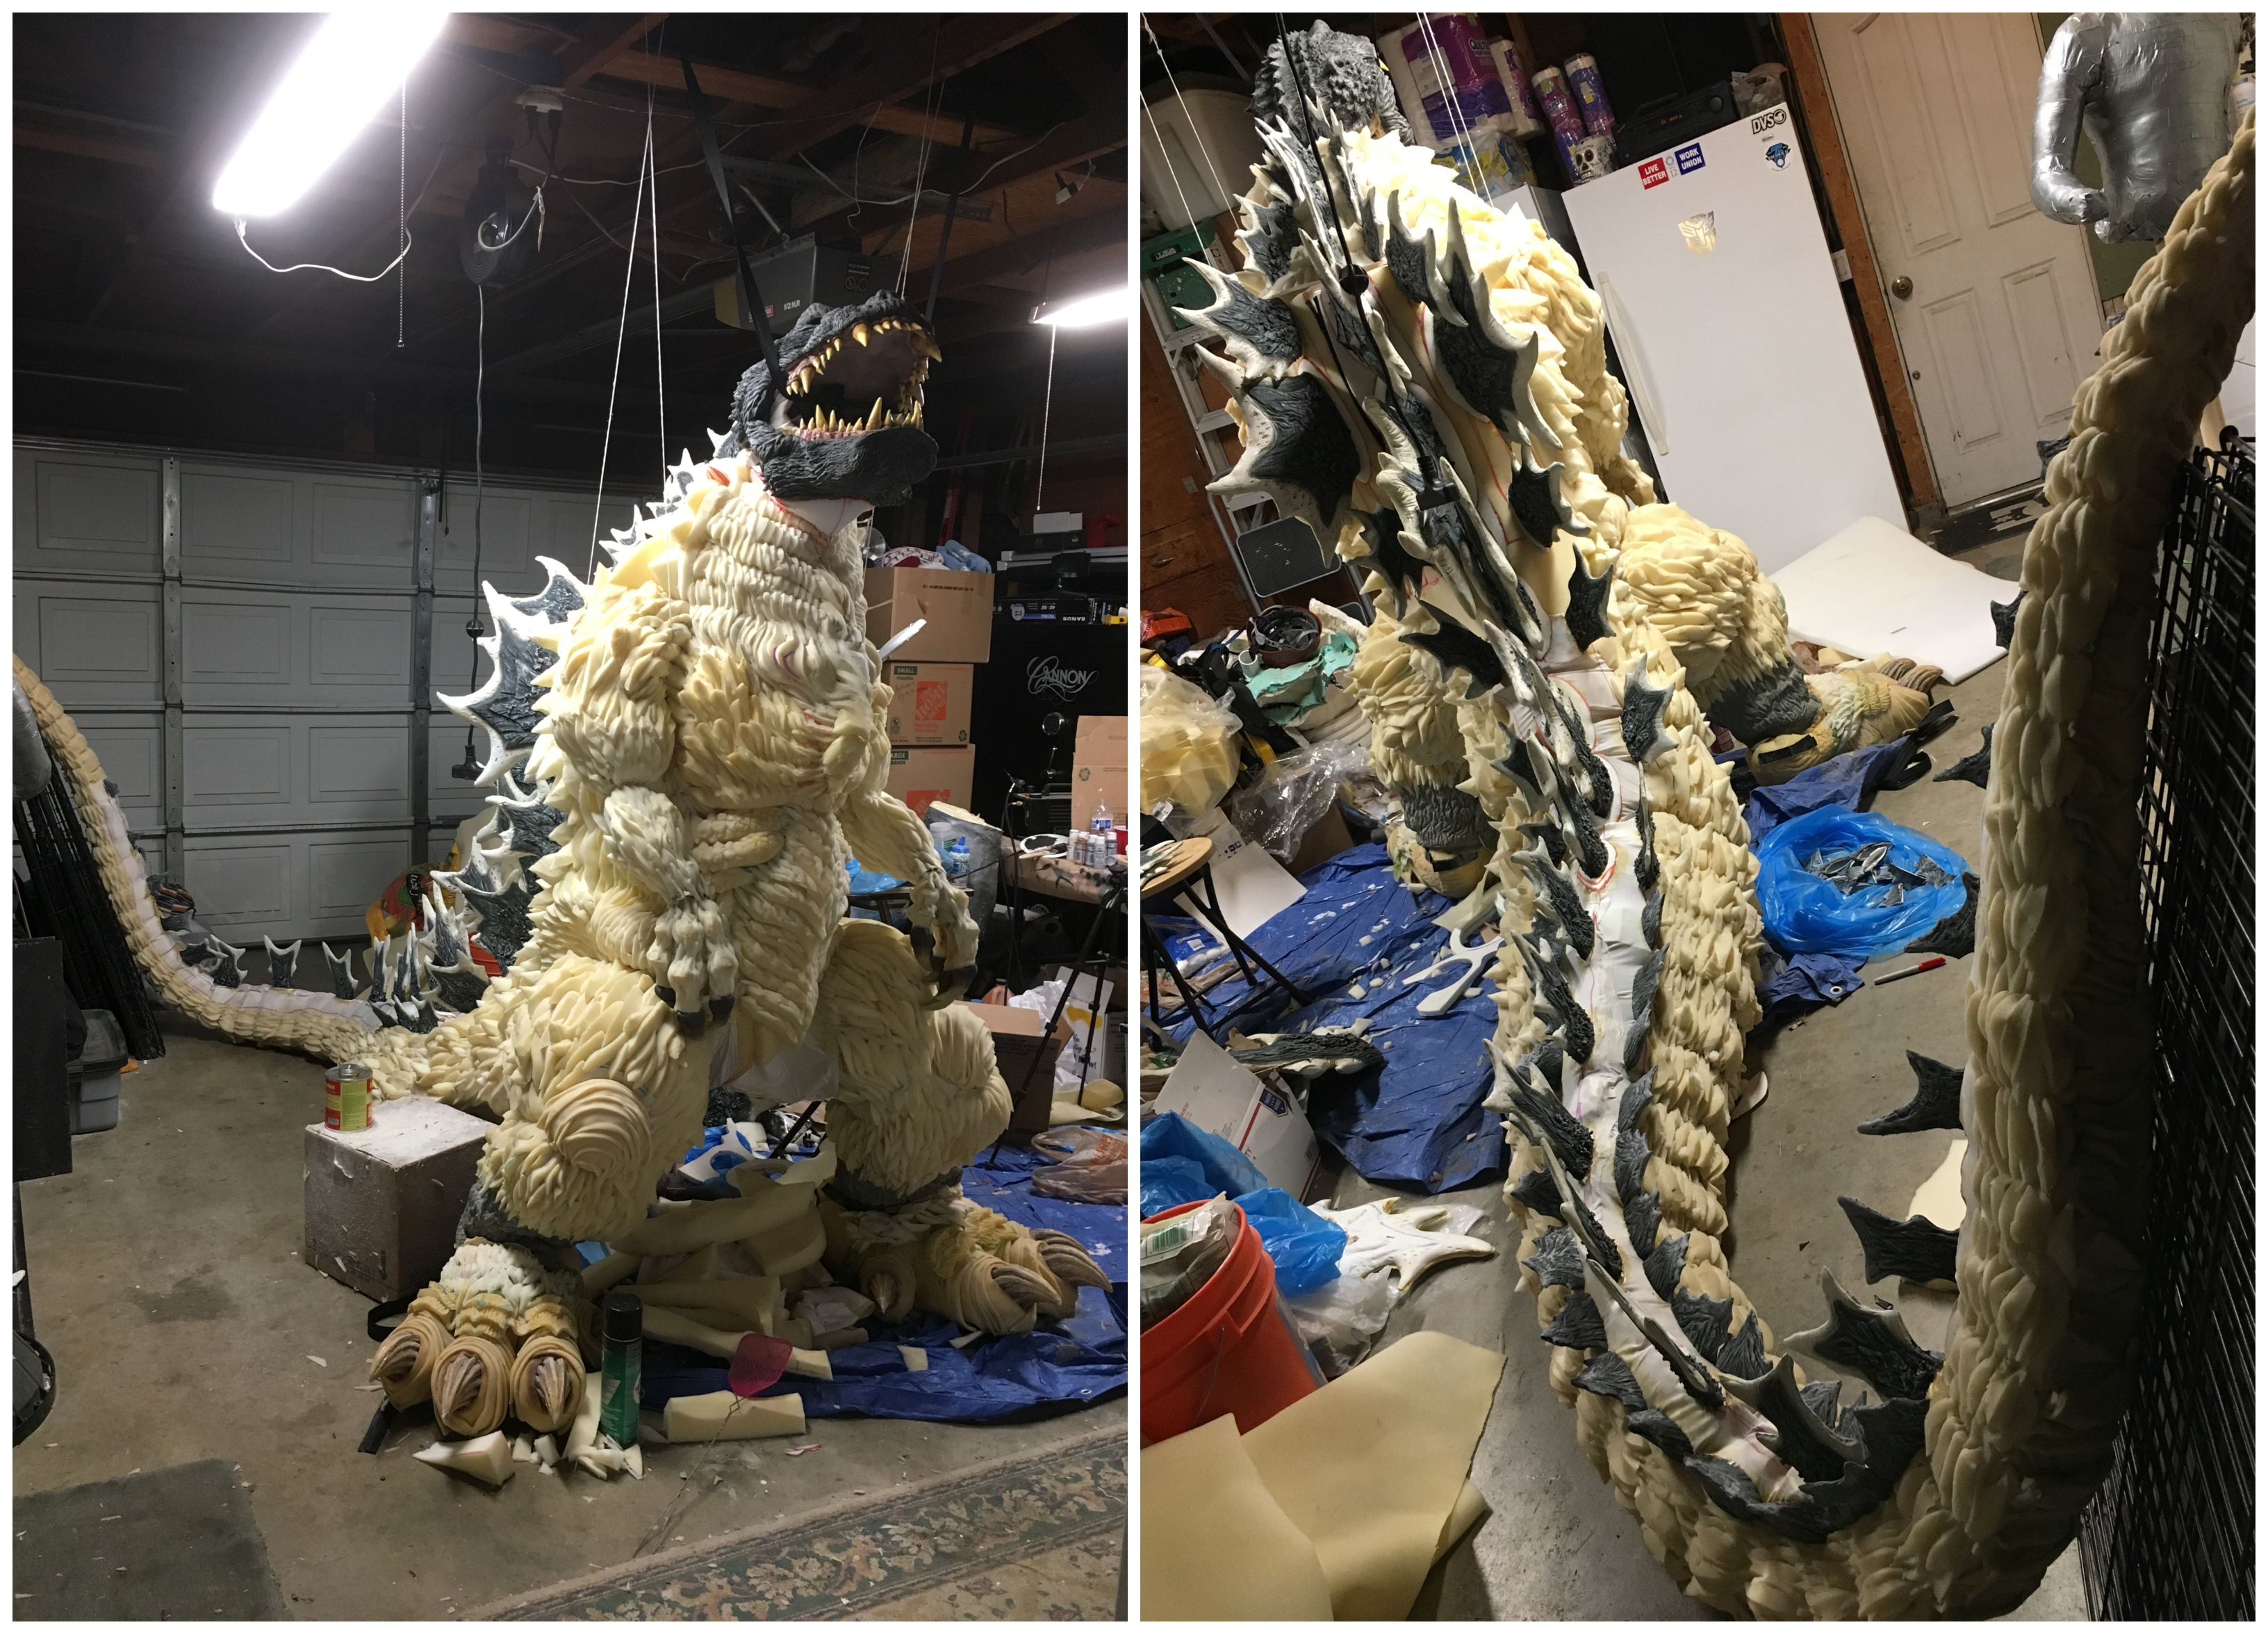 (A sneak peek of the work-in-progress, with some dorsal plates lined up on Fusion Godzilla's back.)
To paint the suit, I used a gravity feed spray gun. I mixed liquid latex with acrylic paint. I used several chip brushes to pop all the scales using the drybrush method. The suit separates at the feet for easier access and maneuverability when getting into the suit. For the hands, I just used gardening gloves with upholstery foam forms glued over them. The claws were carved out of L200 foam. Like the teeth, I coated the toes and claws in epoxy for that realistic shine.
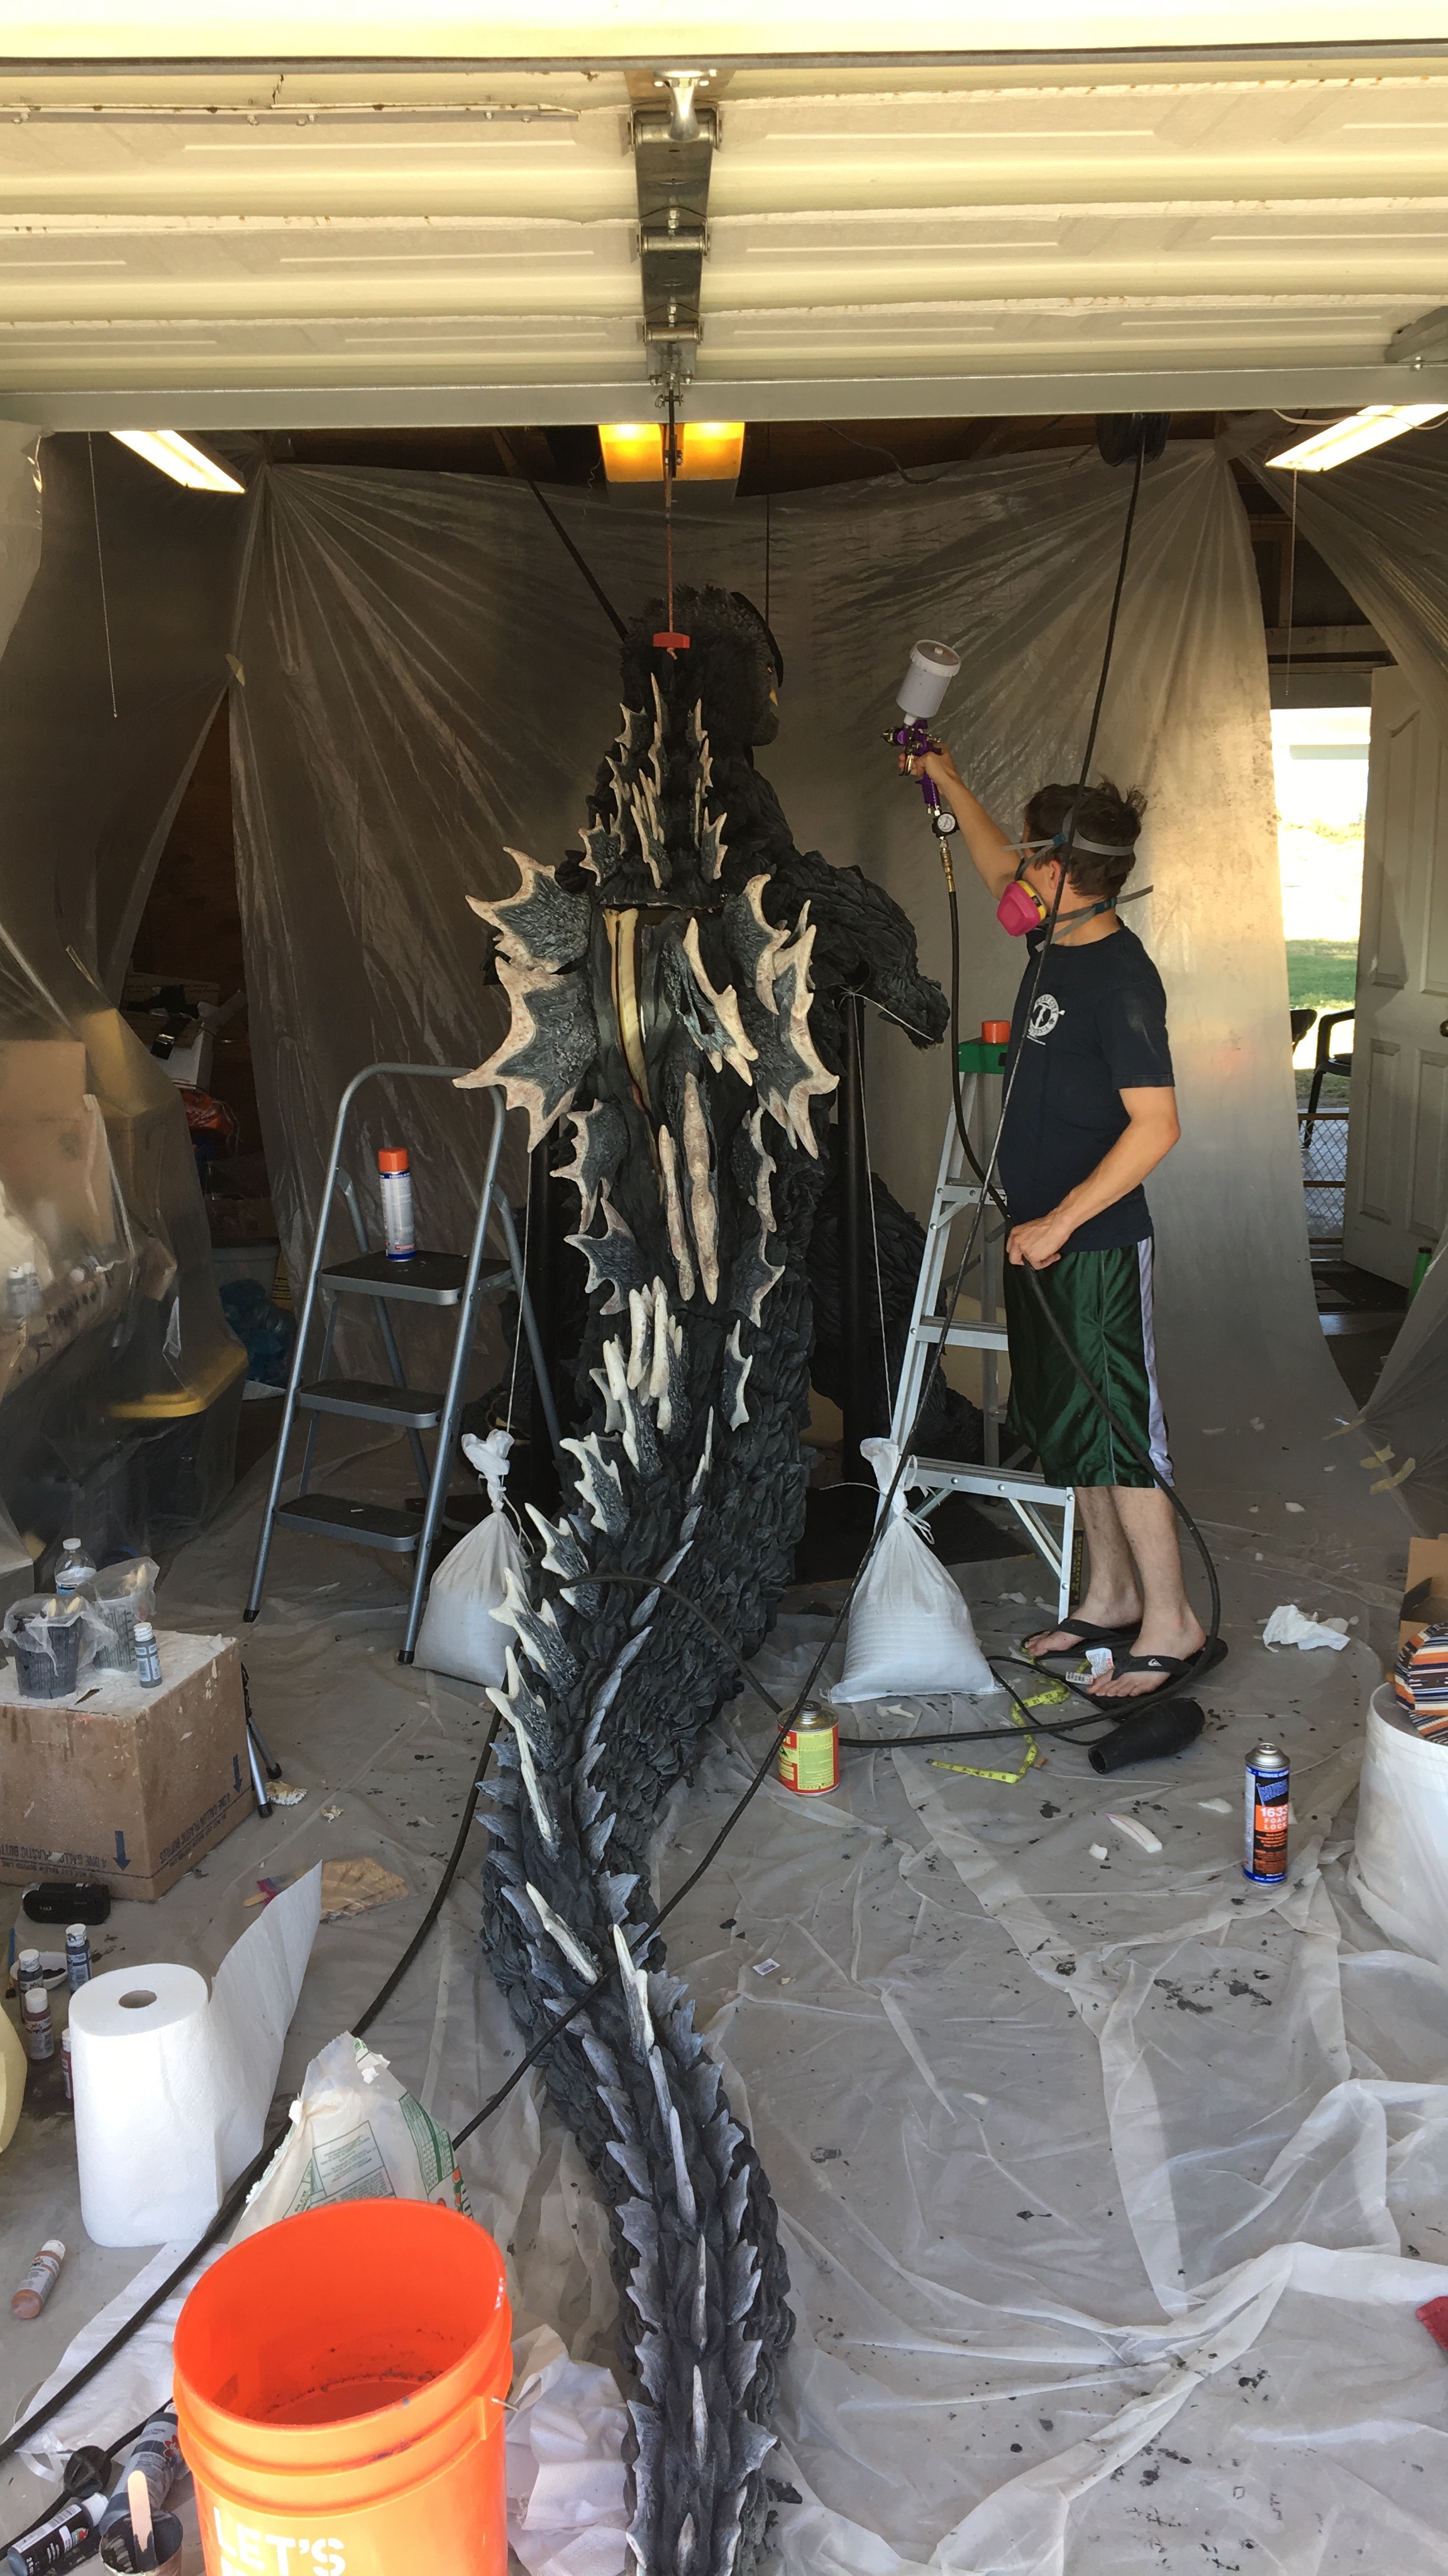 (Painting Fusion Godzilla with a gravity feed spray gun.)
The final suit stands at six feet, five inches tall. I enter the suit through a zipper between the creature's left and middle row of dorsal plates.
 (The six-and-a-half-foot tall Fusion Godzilla suit is ready to be worn.)
I installed a portable USB-rechargeable fan built into the chest. There are disguised holes in the skin texture for the fan to pull in fresh air right to my face. In order to see out of the suit, I also created a few more similarly disguised holes in the neck area.
 (Fusion Godzilla’s premiere weekend at Godzilla Fest 2017.)
Once inside the finished suit, I was able to provide the final element...life! Ta-da! Fusion Godzilla LIVES!
I honestly could not have done it without my friend, Justin Caldera, who was involved with the SWSCA Kaiju Suit Making course and taught me so many amazing foam fabrication techniques. I’d like to express my deepest gratitude towards Stan Winston School for this honor. It was so inspiring to see all the costume submissions, they all stoked the artistic fire within me.
- Krystopher Baioa
You can follow Krystopher on Instagram.
Check out the original 2020 Halloween Costume Contest Winner Announcement: Godzilla by KaijuKrys
View all the entries at the 2020 Halloween Costume Contest.
Do you want to learn to sculpt, mold, cast, and paint? Try our online courses with Hollywood's Master FX Artists: FREE 7-Day Trial.