
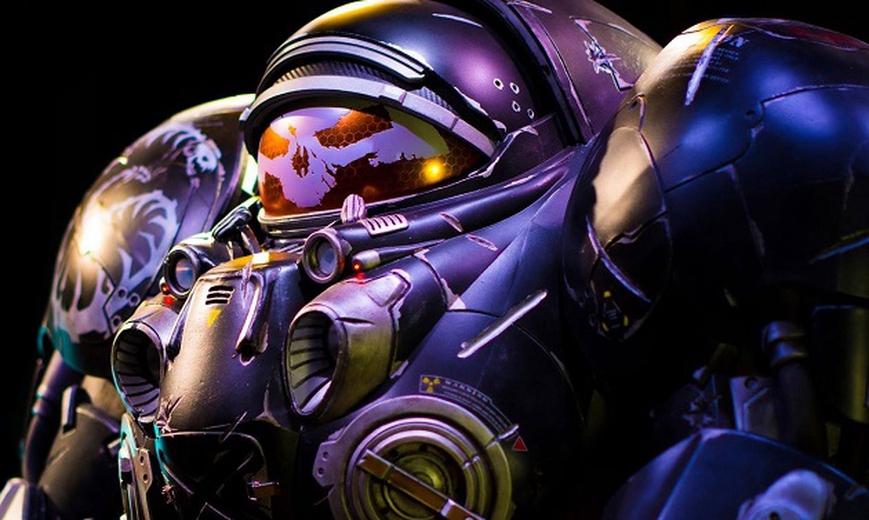
Starcraft 2 Cosplay – Inspiration From Childhood Memories
by Michael Wiggins
I was inspired at a young age when my parents bought me the behind-the-scenes photo book on the making of Jurassic Park. I would stare at those photos for hours, just trying to imagine how those massive, lifelike animals were built. I remember being less impressed by the CGI animals, but the practical effects and costumes running around were so well done that they really pulled you into the movie and made you believe what you were seeing.
 (Stan Winston School Cosplay Contest winner, Michael Wiggins and his "Jim Raynor” armor from Starcraft 2.)
I guess you could say I was one of those kids who had no idea what he wanted to be when he grew up. I always had an affinity for taking things apart and putting them back together. The way things worked fascinated me, but I just wasn’t sure how I could apply those skills practically. I’ve always loved cars and got my hands dirty for a while, tearing them apart and putting them back together better than before.
Jump To Section
- The First Steps in Making “Jim Raynor” Armor
- Using 3D Printing
- My Own Costume From Starcraft 2
- Building the Jim Raynor Suit With Foam
- The Final Result
 (Poseable 3D GrabCAD mannequin models with the Starcraft armor.)
The First Steps in Making “Jim Raynor” Armor
My dad put me to work one summer doing CAD work for his engineering company, and suddenly my tinkering world became virtual. Not only could I disassemble things and reassemble them, but now I could create things that had never existed before! To me, this was a whole new world for not only practicality and real world use, but also an avenue of art and creation I never even knew existed.
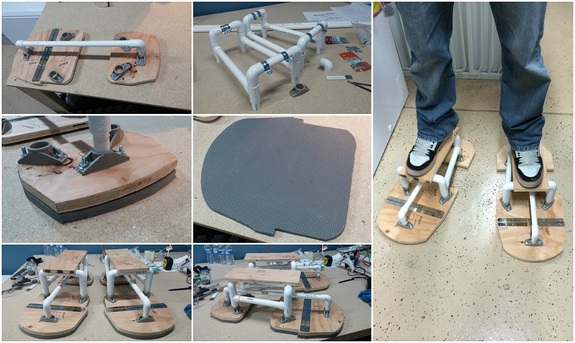 (Building process of the feet. Tools: Pieces of wood, foam sheets, and pipes.)
I wasted no time diving into the software, modeling cars with moving parts and entire functional engines, and eventually started reverse engineering props, weapons, and vehicles I loved from movies and video games.
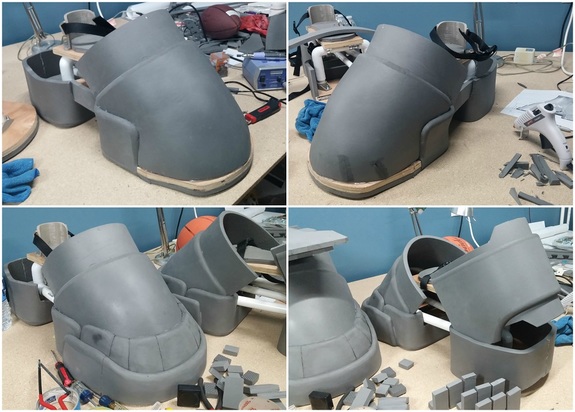 (Foam work begins! Heat, stretch, heat, stretch, cut, trim, heat, stretch, etc.)
I started small: the Element Stones from The Fifth Element, a set of Wolverine claws, and kept expanding from there. A watch, a handgun, the ZF-1, a rock crawler, my Challenger, the Batmobile. All these things lived in my little digital world for me to make pretty pictures of, but I still lacked a practical use for the skills I had developed. I was missing that key that could make my imagination a reality.
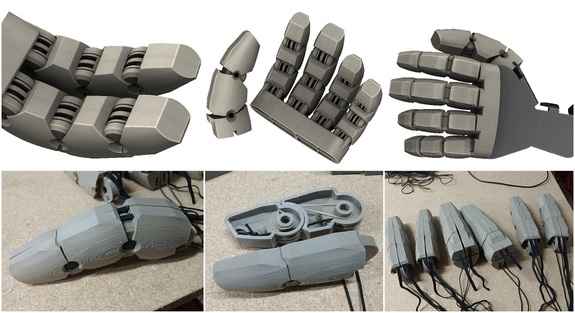 (MKII of the fingers in the CAD software and the 3D printed pieces.)
Using 3D Printing
Then along came a miracle innovation: 3D printing. I’d only heard about it and didn’t know much other than it could bring my computer designs into the real world. One of my coworkers had built a printer of his own, and I just had to try it. I couldn’t wait to make something cool, but I couldn’t think of anything to make that wouldn’t tie up his printer for months on end. I started researching mechanisms and came across a prosthetic hand that you could manipulate by pulling cords, much like a toy I had as a child.
 (I printed out my arm mount template and cut it out of cardboard to mock up the angles of the thumb and my hand in relation to the fingers.)
I immediately started designing the hand, but as my research took me further down the rabbit hole, I stumbled across The RPF (Replica Prop Forum), and a blog written by a man who built an entire suit of armor from a video game, Warhammer 40k. I was astounded by this hulking, battle-torn character walking around larger than life, shaking onlookers’ hands with his enormous articulated power fist. Another new world was opened to me in the form of cosplay.
My Own Costume From Starcraft 2
At this point, I went to my wife and said, “I want to build a costume.” To which she replied, “Really? Ok ,if you want to!” I’m pretty sure she had no idea what I was getting myself into. I know I didn’t at the time. I redesigned my fingers to be much larger, without really knowing where I was going with it, intending to make them work with some oversized creature or suit. But then it hit me.
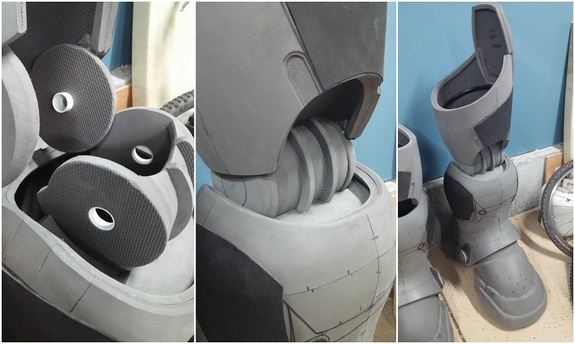 (Knee joints were kind of tricky, but like so many things, the solution turned out to be far more simple than I was making it out to be. I added supports to the thighs, which were double thick for extra strength.)
I remembered the opening cinematic of the newly released Starcraft 2, where Tychus Findlay is suited up in his CMC armor by a large robotic apparatus. The scene was amazing, watching as the metal frame was bolted together, the armor plating welded on top, sealing him in. That was it! I was sold.
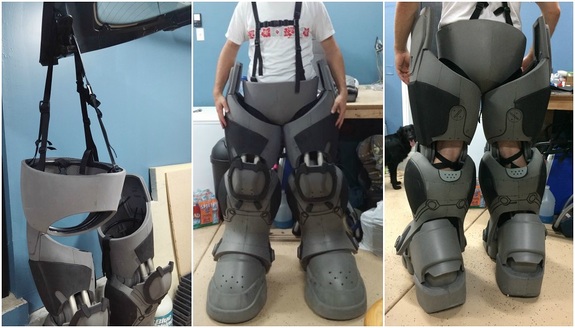 (First suit test with the finished parts.)
Now came the problem, how to bring a video game character to life. I turned back to my trusty CAD software and built a full-scale suit from the ground up, adding every detail I could pick apart from whatever reference material I could find. I built it as if it was made for a person to fit inside, and scaled the fingers to match, taking into account where the user's hands would end up while wearing the suit.
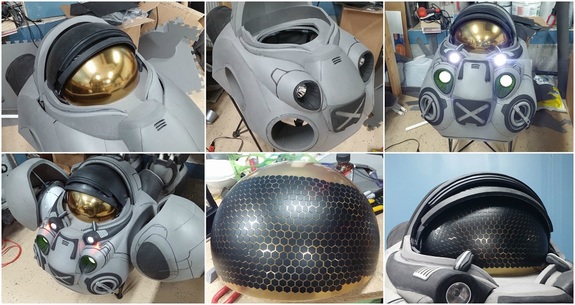 (Building process of the head and the upper body.)
 (The last print for the gun is complete! I printed off the individual pieces, assembled each half then stuck it all together.)
Building the Jim Raynor Suit With Foam
With the design done and a 3D printer spitting out finger segments, next came the task of figuring out how to build the rest of it. I couldn’t very well print the entire thing, it would weigh a ton and cost a fortune! I returned to the blog and found the answer: foam. It had never occurred to me that such things could look like steel but be made from cheap, lightweight materials. I ran to the hardware store and bought my first pack of floormats. Over the course of the next two years, I refined the CAD model, created foam patterns, bent the foam to shape, added PVC pipe for support, added servos, lights, harnesses, and fans, learned how to seal and paint it, and finally got to try it on.
 (Almost ready.)
 (The suit up! Here it is, at last, the big reveal!!)
Full buildup slideshow of my "Jim Raynor" Armor cosplay. Debuted at Salt Lake Comic Con, 2016:
The Final Result
The end result could not be more satisfying. It stands seven feet tall, with shoulders five feet across and an arm span of almost ten feet. It weighs in at exactly 90 pounds, including the 3D printed pistol I designed last minute. I can pick things up with the hands and move around fairly easily. I can see through the inner layer of the actuated dual visor, and keep cool with a pair of PC fans mounted in the back, and everything is controlled by switches in the hands.
 (The finished, painted "Jim Raynor" armor by Michael Wiggins. Photos by Martin Wong.)
 (Photoshoot with the finished armor.)
StarCraft 2 Terran Marine - Cosplay buildup vids - Part 1, Hand Design & Operation:
StarCraft 2 Terran Marine - Cosplay buildup vids - Part 2, First Full Suit Up:
When I started this journey, I never thought it would lead me here. What began as a simple thought turned into a two-year project that sent me down a road I didn’t even know existed. It’s taught me countless new things, pushed my limits further than I ever thought they could go, introduced me to so many wonderful people, and allowed me to finally begin to realize my dream of bringing imagination into reality.
Walking around as "Jim Raynor" at Salt Lake Comic Con 2016:
- By Michael Wiggins
Check out the entire build-up on theRPF.com
Follow Michael's Facebook page: RedRock Cosplay and Props
Subscribe to Michael's YouTube channel here: Michael Wiggins
The Cosplay Contest Winner Announcement: Jim Raynor - Starcraft 2 CMC Armor
View all the entries at Cosplay Contest
Do you want to learn to sculpt, mold, cast, and paint? Try our online courses with Hollywood's Master FX Artists: FREE 7-Day Trial.